


Tourniquet Application: A Step-by-Step Guide
.png)
At 02:14, a construction foreman arrives in the resuscitation bay with a mangled forearm. Blood is soaking through the gauze while two nurses maintain pressure, and the team needs a reliable next step before the patient becomes unstable. In that moment, tourniquet application isn't a theory exercise. It's a time-critical clinical skill.
A tourniquet can control life-threatening extremity hemorrhage when pressure alone isn't enough, but the device only works when placement, tightening, verification, and documentation are done correctly. This guide walks through those decisions in plain language, including the two failure points clinicians often miss: confirming that distal bleeding has stopped and knowing when to add a second device.
Why Tourniquet Application Still Matters in 2026
Modern tourniquet use grew from military experience in Iraq and Afghanistan, where evidence-based hemorrhage control became a central part of trauma care. Publicly accessible military reviews estimate that tourniquets prevented mortality in approximately 1,000 to 2,000 U.S. military personnel, while large evidence syntheses reported survival rates of 87% to 100% among casualties treated with prehospital tourniquets. Across nine studies, the pooled survival estimate was 91.9%, with a 95% confidence interval of 88.1% to 94.6%. These findings helped establish tourniquets as a cornerstone intervention for severe extremity bleeding and influenced civilian emergency protocols worldwide. (EMS.gov review of prehospital tourniquets and hemostatic dressings)
The practical shift is larger than the device itself. Since the landmark 2012 Hartford Consensus, emergency teams have increasingly treated uncontrolled external bleeding as an immediate threat that requires action alongside airway, breathing, and circulation priorities. Civilian clinicians encounter these injuries after vehicle crashes, industrial accidents, construction incidents, and mass-casualty events.
Public bleeding-control kits and Stop the Bleed education also mean a patient may arrive with a tourniquet already applied by a bystander, security officer, police officer, or first responder. You may need to assess whether it was placed correctly, confirm that hemorrhage is controlled, and document the time rather than removing it.
Why older concerns don't tell the whole story
Earlier reluctance was shaped partly by Vietnam-era concern about limb ischemia and tourniquet complications. Current evidence supports early, correct use for life-threatening extremity hemorrhage, with military reviews reporting strong survival outcomes and limited complication rates when devices are applied appropriately. The risk of uncontrolled blood loss is immediate, while the risks of an incorrectly applied device often come from poor placement, inadequate tightening, or failure to reassess.
The wilderness first responder guidance is useful context because remote environments remove many of the resources clinicians take for granted in the emergency department. In any setting, the same principle applies: control catastrophic bleeding first, then continue definitive evaluation and treatment.
Practical rule: A tourniquet isn't successful because it's on the limb. It's successful when the bleeding has stopped and the application has been recorded clearly.
The rest of the skill is disciplined execution. Identify the source, choose the correct site, tighten until arterial flow is occluded, verify the result, and communicate what happened.
When to Apply a Tourniquet and When to Hold Off
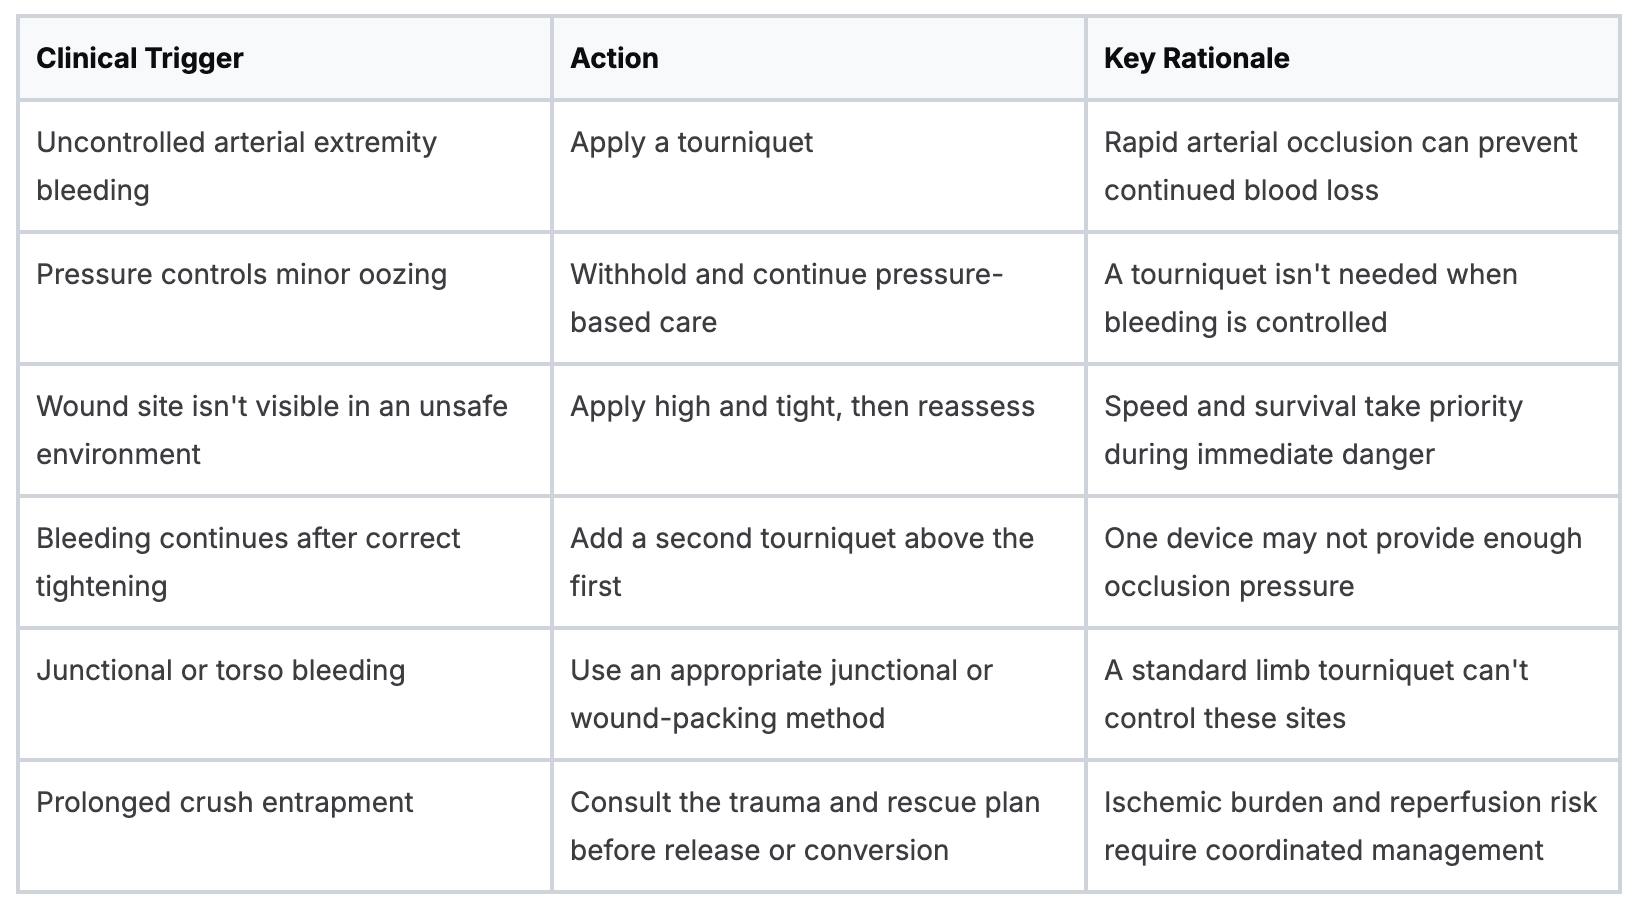
A patient arrives with blood pooling beneath an injured leg, the dressing saturating as you work. Sort the decision into three branches: apply, withhold, or escalate. Apply a tourniquet for uncontrolled extremity hemorrhage, especially when direct pressure fails, the wound is difficult to compress, or the scene demands rapid hemorrhage control.
The International Committee of the Red Cross recommends applying a tourniquet over clothing when necessary, using a high-and-tight position when the wound site is unclear, or placing it approximately 5 to 7 cm above the bleeding site when the source is identifiable. (International Committee of the Red Cross pre-hospital guidance) U.S. Department of Homeland Security guidance similarly advises positioning the device at least 2 to 3 inches from the wound and avoiding a joint. If hemorrhage continues, place a second tourniquet just above the first. A third may be needed 2 to 3 cm above the joint or above the second tourniquet, according to the situation.
Apply, withhold, or escalate
Use a tourniquet when blood loss is severe, ongoing, and comes from an arm or leg. Pulsatile bleeding, rapidly pooling blood, traumatic amputation, or dressings becoming saturated all warrant immediate escalation when pressure is not working.
Withhold the device when bleeding is minor and controlled by direct pressure, a pressure dressing, or a hemostatic dressing. A small distal fingertip injury with a visible source may be managed more precisely without stopping circulation to the entire digit or limb. Junctional bleeding around the groin, axilla, or neck requires another hemorrhage-control method because a standard limb tourniquet cannot address those sites.
The two checks that prevent many field failures are simple: confirm that bleeding has stopped, then decide whether one device is enough. A fully tightened tourniquet that leaves distal bleeding means the system has not worked yet. The device may be too distal, the strap may lack tension, the limb may be too large for it, or the tourniquet may rest over a joint or unsuitable surface. Correct the problem and add a second tourniquet above the first when needed.
Tourniquet decision triggers at a glance
Children require the same priority, but device fit, limb size, and available pediatric equipment matter. An adult device may not perform predictably on a small limb. Follow local pediatric trauma protocols and seek senior support early.
Clinicians maintaining broader resuscitation competence may consider online options such as ACLS Certification from ProMed Certifications. A self-paced course can support ongoing review of ACLS concepts and provide a structured way to maintain knowledge alongside hands-on practice. Online learning should reinforce, not replace, local protocols, supervised skills practice, and the clinical judgment required to verify hemorrhage control.
For team-based response, emergency response team training can reinforce role assignment, communication, and rapid escalation during chaotic scenes. A clear call for help, a stated tourniquet time, and confirmation that distal bleeding has stopped keep the team working from the same information.
Tourniquet Types and How to Choose the Right One
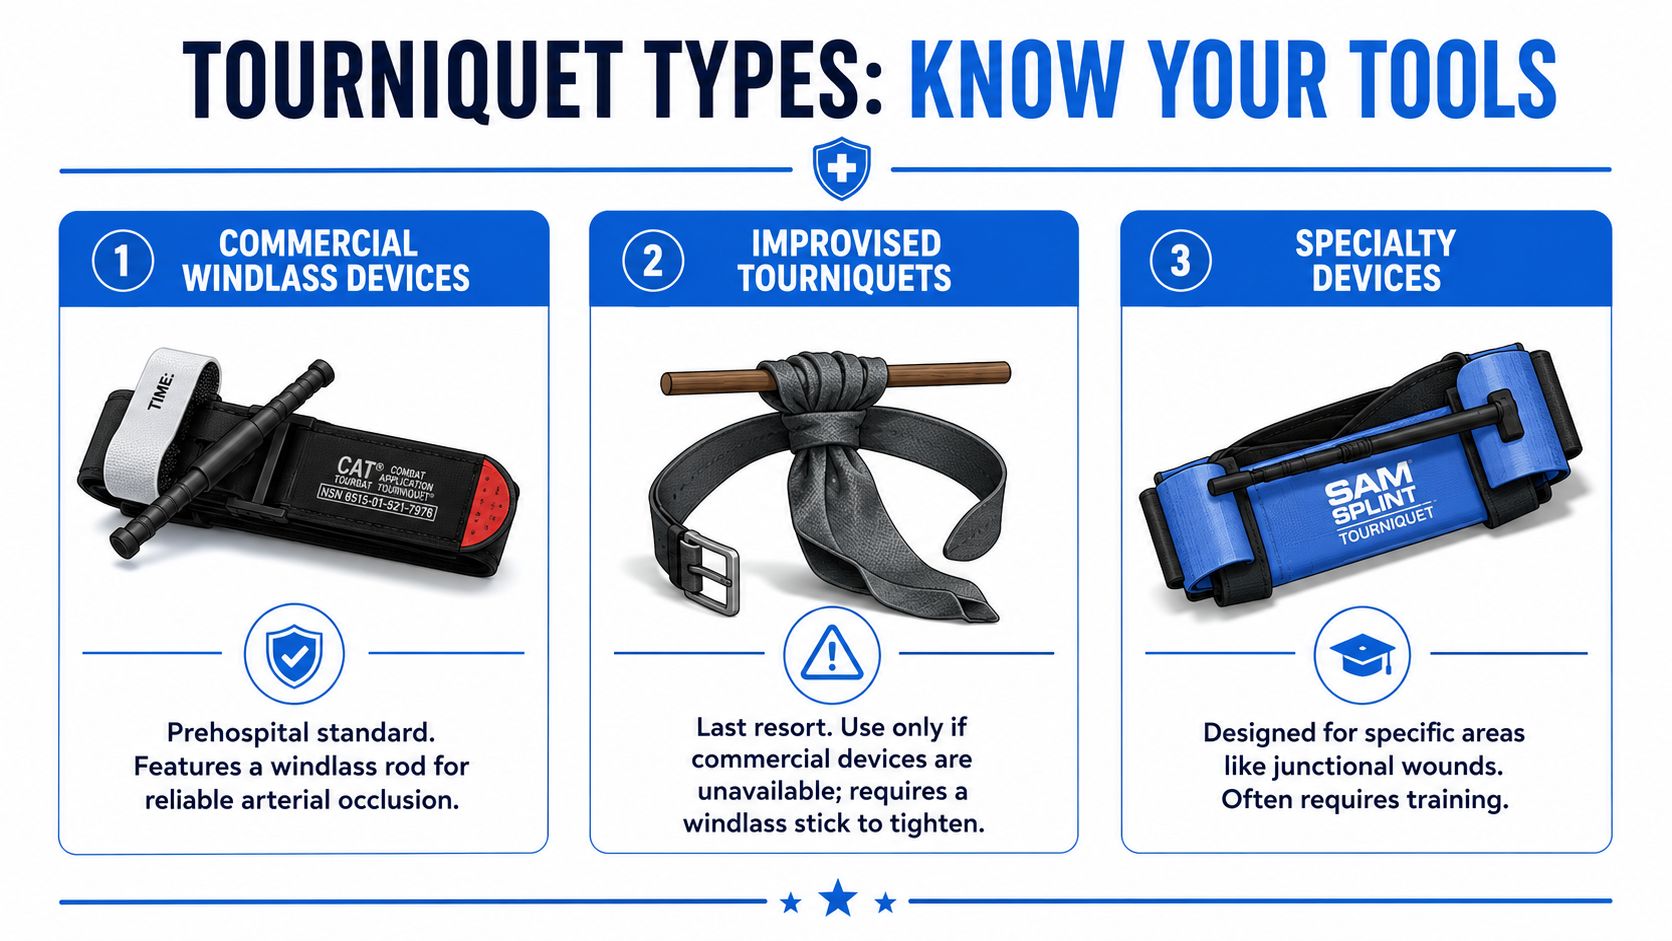
The best tourniquet is the one that matches the setting, fits the limb, and can be tightened enough to stop arterial flow. Clinicians should recognize three broad categories: commercial windlass devices, elastic or stretch-wrap devices, and improvised tourniquets.
Commercial windlass devices
Devices such as the Combat Application Tourniquet, or CAT, and the SOF Tactical Tourniquet, or SOF-T, are common field choices. They use a broad strap and a rigid windlass rod. The strap creates circumferential pressure, while the windlass allows the clinician to increase tension until arterial bleeding stops.
These devices are the default for many prehospital limb injuries because they're designed for rapid deployment, can be secured with one hand in some configurations, and include a mechanism for locking the windlass. They're also familiar in emergency departments, where a prehospital application may need inspection, reinforcement, relocation, or replacement.
Elastic and stretch-wrap options
Elastic tourniquets can sit closer to the limb and may be faster to apply on tapered extremities. Their lower profile can help with transport, imaging, or access around bulky dressings. The tradeoff is that they depend heavily on correct tension and technique.
A stretch-wrap device that's applied too loosely may look secure while failing to occlude arterial flow. In hypotensive patients, the absence of an obvious pulse isn't enough to prove the device is effective, so you still need to confirm that bleeding has stopped.
Improvised devices
An improvised tourniquet is a last resort when a commercial device isn't available. It needs a wide band, a rigid windlass, a secure windlass lock, and a clearly written application time. Narrow cords, wire, shoelaces, or thin rubber tubing concentrate pressure and can cut into tissue without producing reliable arterial occlusion.
A belt alone usually doesn't provide enough tightening control. If improvisation is unavoidable, use the broadest strong material available, tighten it with a rigid rod, secure the rod so it can't unwind, and communicate that the device is improvised.
Selection depends on whether you're working in a tactical environment, an ambulance, or a hospital. Consider limb shape, patient size, anticipated transport, and whether a high-and-tight field application may need to be repositioned after arrival. Specialty junctional devices require specific training and aren't interchangeable with standard extremity tourniquets.
Applying the Tourniquet Correctly
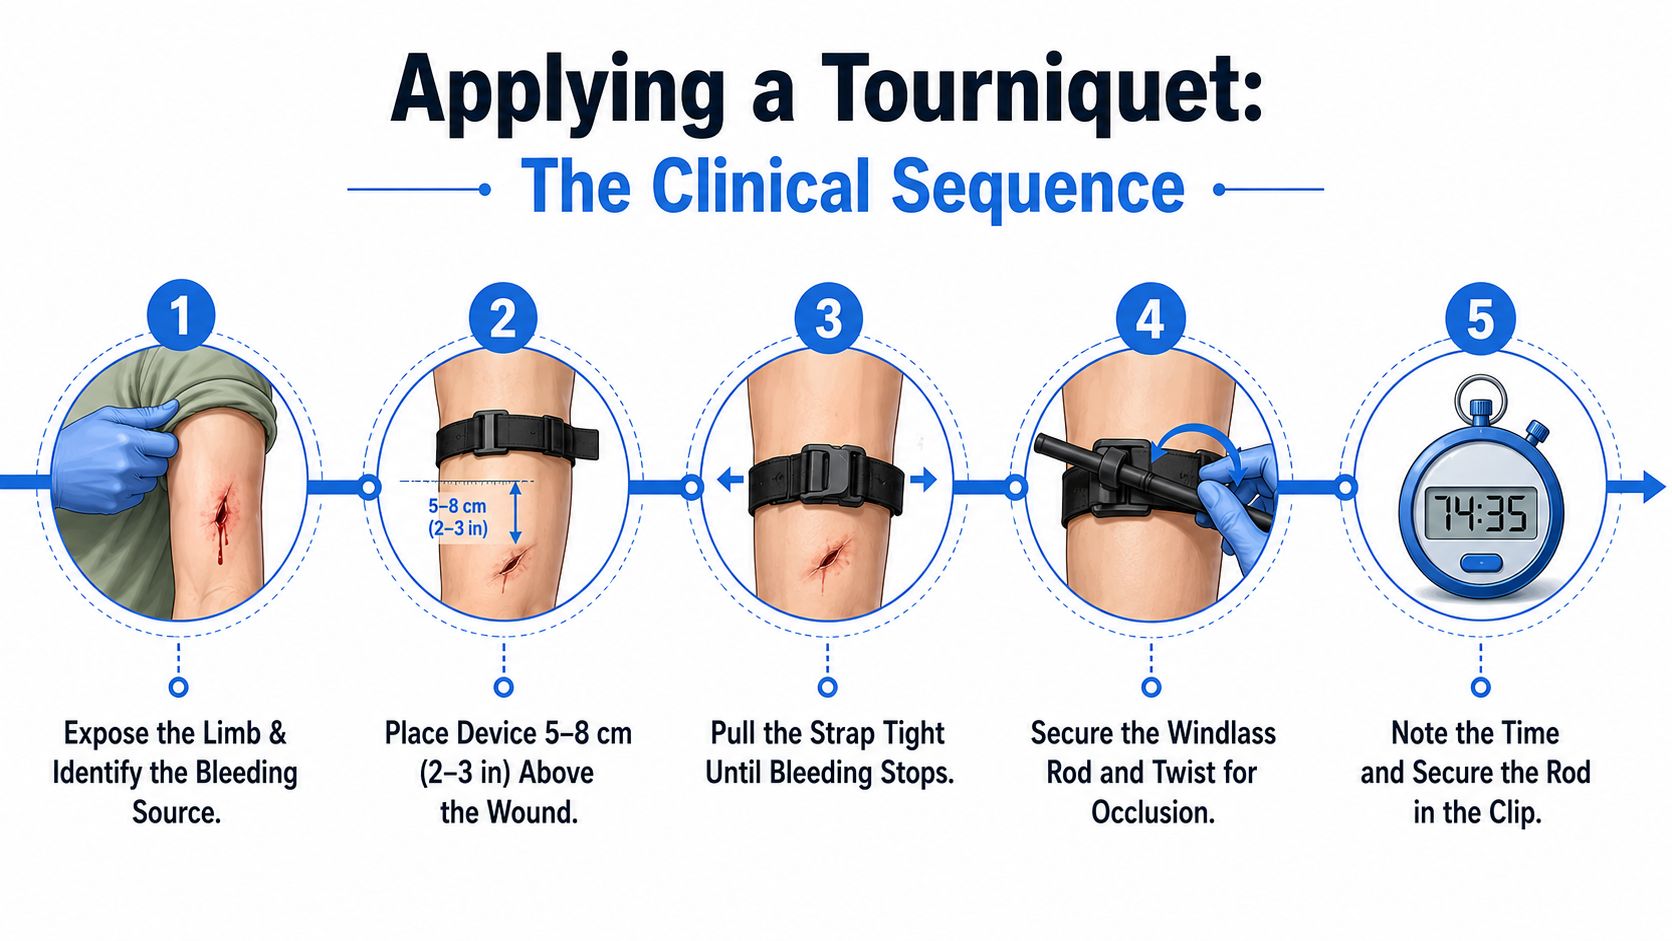
A patient is losing blood during a chaotic transfer. Clothing obscures the wound, the first tourniquet feels tight, and the team is already preparing to move. Use a fixed sequence: expose what you can, position the device to compress the artery, tighten until hemorrhage stops, verify the result, then secure and document it. Deliberate action prevents both delay and false reassurance.
The clinical sequence
- Expose and identify the wound. Cut or remove clothing when the environment allows. Locate the bleeding source and inspect the limb quickly. If the site cannot be seen or the scene remains unsafe, apply high and tight over clothing. Reassess and reposition when conditions permit.
- Choose the placement site. Place the tourniquet approximately 5 to 7 cm above the wound, or at least 2 to 3 inches away from it. Never position it directly over the elbow or knee. For a wound near a joint, place the device above the joint while keeping it proximal to the bleeding source. Over-clothing placement is appropriate when access or safety requires it.
- Pull the strap tight before turning the windlass. Thread the strap correctly, remove slack, and secure it firmly. A loose strap leaves the artery partly compressed, like a clamp that never closes fully. The windlass increases pressure, but it cannot correct poor strap tension.
- Turn until bleeding stops. Twist the windlass until visible bleeding has ceased. Do not stop because the patient reports pain. Tourniquet application is painful, and loosening the device without a clinical reason can restore blood flow to the wound.
- Lock and record. Secure the windlass in its clip or locking mechanism. Write the application time on the device marker or patient record. During transfer, state the time aloud so the next team hears it and can preserve the information.
Verification is the step people skip
Look directly at the wound after tightening. Confirm that bleeding has stopped, rather than merely slowed. Check the distal pulse when clinically feasible. A persistent pulse, continued spurting, or blood tracking beneath dressings indicates that arterial occlusion has not been achieved. The absence of a pulse does not replace direct inspection of bleeding control.
If hemorrhage continues, apply a second tourniquet side-by-side and just above the first, or immediately proximal to it according to the device and local protocol. Do not spend extended time repeatedly adjusting a failing device while blood loss continues. Additional devices may be needed when the first one does not control the hemorrhage, as noted in earlier pre-hospital guidance.
A defense medical guideline distinguishes immediate danger from settings where there is time for better access. Over clothing may be appropriate during immediate danger, while direct skin placement is preferred when conditions allow. High-and-tight or over-uniform applications should be reassessed, and repositioning with a second tourniquet directly on skin may be required.
Follow the local device instructions and institutional trauma protocol for pediatric placement, skin protection, and conversion decisions. Do not release a tourniquet casually in the field.
Monitoring, Timing, and Documentation in Real Care
A tourniquet changes the next phase of care. Once hemorrhage is controlled, the team must preserve that control while monitoring the patient, preparing definitive treatment, and communicating ischemia time.
Consider a patient arriving with a tourniquet on the upper leg after an industrial injury. The first clinician confirms the device location, asks when it was placed, examines the wound, checks distal circulation, and records pain and neurovascular findings. The team doesn't remove the tourniquet because the patient has reached the emergency department.
A practical reassessment rhythm
For ongoing hemorrhage, reassess at 15-minute intervals. Once the patient is stable, an hourly check may be used when consistent with local protocol and clinical judgment. At each touchpoint, assess:
- Bleeding control: Look at the wound and dressings. Blood that continues to pool, seep, or track requires action.
- Distal circulation: Check for a distal pulse when possible and compare the finding with the documented baseline.
- Neurovascular status: Record sensation, movement, temperature, and color below the device.
- Pain: Severe pain is expected, but sudden changes or pain out of proportion require evaluation.
- Compartment concerns: Increasing tense swelling, worsening pain, sensory changes, or motor deficits should prompt urgent trauma and surgical assessment.
The exact response depends on injury pattern, transport time, operative planning, and the receiving team's capabilities. A high-and-tight application may need relocation once the wound is exposed, but only after another device or definitive pressure-based method can maintain hemorrhage control.
Handoff is part of treatment
Write down the time of placement, device type, limb location, distal pulse status, neurovascular findings, and total ischemia time at transfer. Ask the receiving clinician to acknowledge the information verbally. This prevents the tourniquet from becoming an undocumented object that follows the patient from one care area to another.
A concise SBAR-style handoff might sound like this:
Situation: “This patient has uncontrolled left lower-leg hemorrhage controlled with a CAT tourniquet.”
Background: “The device was placed by EMS after direct pressure failed.”
Assessment: “Bleeding is currently absent, and the distal pulse is not palpable. Sensation and movement are documented as follows.”
Recommendation: “Continue tourniquet protocol, record reassessment findings, and coordinate definitive hemorrhage control.”
The patient also needs standard precautions, exposure control, and safe handling of contaminated materials. Review bloodborne pathogens precautions alongside your trauma workflow, especially after high-volume blood exposure.
Flexibility improves access to deliberate practice
A classroom course creates useful live interaction, but it also requires a shared schedule, travel, and time away from clinical duties. Online learning lets a nurse, paramedic, or physician revisit a hemorrhage scenario after a shift, repeat a difficult module, and study in shorter sessions.
That flexibility matters for tourniquet competency because clinicians may not encounter catastrophic bleeding often. A single classroom session can introduce the skill, but scenario-based online review can revisit the decisions that determine success:
- Rapid hemorrhage assessment
- Tourniquet selection under stress
- Correct placement away from joints
- Tightening until bleeding stops
- Adding a second device when the first fails
- Accurate time-of-application documentation
Another review found that 8 of 11 online CME studies, or 72.7%, showed significant improvement in at least one outcome, including satisfaction, knowledge, or practice change. A separate evaluation involving more than 300 healthcare professionals found significant increases in knowledge and self-reported practice performance change, while a 2023 online CME study reported 85.21% satisfaction, 87.29% saying content would influence practice, and 78.07% reporting practice changes at three months. (Online continuing professional education evaluation)
Hospitals, clinics, and professional organizations are increasingly recognizing accredited online CE and certifications. The strongest model isn't online versus in-person. It's online learning for knowledge, decision-making, and repetition, paired with periodic in-person skills validation when hands-on assessment is required by an employer, regulator, or local policy.
Your Competency Checklist Plus Next Steps
Use this checklist after a shift, simulation, or trauma review. Mark yes only when you can demonstrate the behavior, not when you merely recognize the wording.
- Identify the hemorrhage: Yes / No. Did you locate the bleeding source and determine whether it involved an extremity?
- Choose the right intervention: Yes / No. Did you decide whether pressure, a hemostatic dressing, a tourniquet, or another method was appropriate?
- Select the device: Yes / No. Did you choose a commercial, elastic, or improvised device that matched the setting and limb?
- Place it correctly: Yes / No. Did you position it above the wound and away from the elbow or knee?
- Expose when appropriate: Yes / No. Did you reassess an over-clothing or high-and-tight application when the environment became safer?
- Remove strap slack: Yes / No. Did you pull the strap tight before turning the windlass?
- Secure the windlass: Yes / No. Did you lock the rod so it couldn't unwind during movement?
- Confirm bleeding control: Yes / No. Did you inspect the wound and confirm that distal bleeding had stopped?
- Check distal circulation: Yes / No. Did you document the distal pulse finding after application?
- Record the time: Yes / No. Did you write the application time on the device or in the patient record?
- Recognize deterioration: Yes / No. Did you reassess pain, color, sensation, movement, swelling, and possible compartment syndrome?
- Escalate appropriately: Yes / No. Did you know when to add a second tourniquet, call for surgical help, or use a supervised conversion plan?
- Complete the handoff: Yes / No. Did you communicate device type, location, time, bleeding status, and neurovascular findings?
- Restore readiness: Yes / No. Did you restock used equipment and discuss the case with the team?
- Refresh the skill: Yes / No. Did you complete a current refresher module or supervised practice during the quarter?
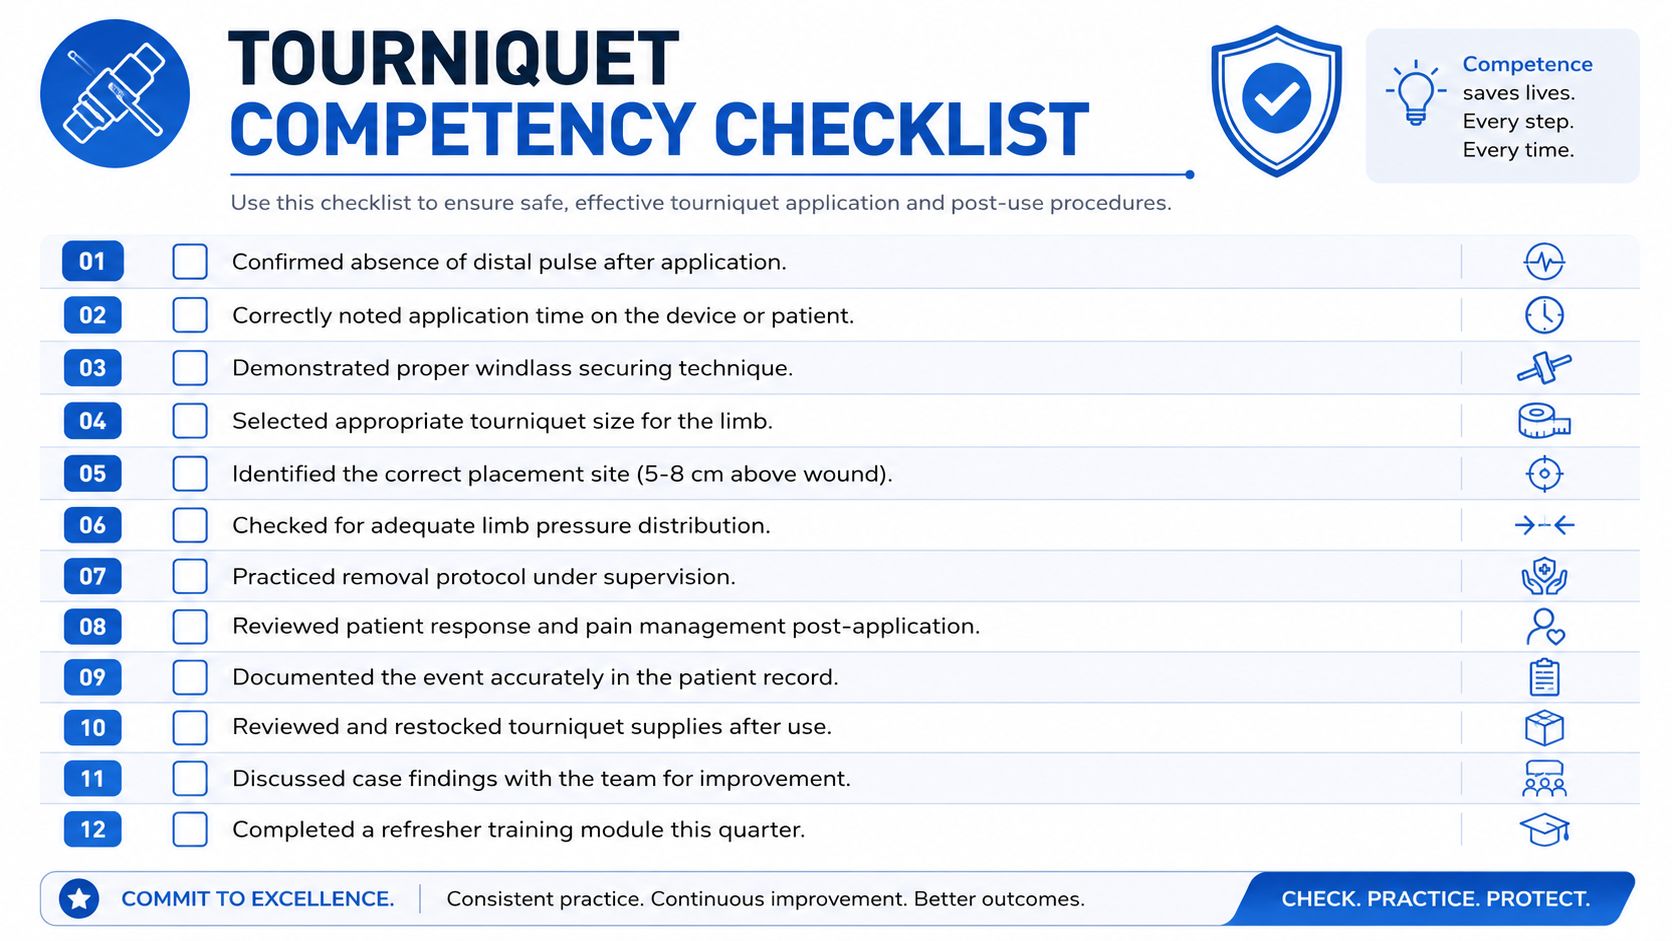
The checklist reveals significant gaps. A systematic review reported correct tourniquet application success rates ranging from 21.92% to 69.8%, depending on the population and training approach. One pilot study found just-in-time instructions increased successful placement from 20.41% to 44.14%, with a risk ratio of 2.16 and a 95% confidence interval of 1.21 to 3.87. Another study of non-medical personnel reported an overall failure rate of 80.33%. (Systematic review of tourniquet application performance)
The most common problem isn't always ignorance of the procedure. In one pilot study, insufficient tightness accounted for 74.1% of unsuccessful applications, incorrect technique for 44.4%, and improper positioning for 16.7%. (Pilot study of tourniquet application failure) That's why your next steps should be concrete: print the checklist, review your device, and schedule a mock hemorrhage drill with your team.
Book an online BLS or ACLS recertification course that includes hemorrhage-control review and assessment, then arrange hands-on validation if your workplace requires it. ProMed Certifications offers online medical certification and continuing education courses that let healthcare professionals study on a flexible schedule, making it a practical way to maintain tourniquet decision-making between real emergencies. Use the checklist during your next skills session, then turn every “no” into a specific practice goal.
.avif)
Stay compliant with ProMed+
Certifications included: ACLS, BLS, PALS, CPR & Neonatal Resuscitation
Unlimited continuing education: over 200 hours of accredited CME
All-inclusive: One price. No surprises.
Get certified today

The Advanced Cardiac Life Support (ACLS) is an accredited online medical certification course that teaches medical professionals to respond to nearly all cardiopulmonary emergencies.

The Pediatric Advanced Life Support (PALS) Recertification instructs medical professionals on performing pediatric cardiopulmonary resuscitation in emergencies.

The Basic Life Support (BLS) Recertification is intended to teach healthcare professionals the basic steps of CPR and rescue breathing for adults, children, and infants.

Our online medical certification course for CPR, Automated External Defibrillator (AED), and First Aid is designed to teach adult, child, and infant CPR and AED use.

The Neonatal Resuscitation Certification trains medical professionals in performing resuscitation procedures and life-saving techniques for newborns at the time of delivery.

.png)
.png)
.png)