8 Basic CPR Test Questions with Answers and Explanations
You're reviewing CPR material between shifts when a colleague describes freezing during a skills check. They knew the steps, but the question presented them differently. Suddenly, your own exam feels less predictable.
Familiarity with basic CPR test questions turns recognition into a clear decision. Practice explaining why an answer fits the patient, the setting, and your role. That habit holds up when a question changes one small but important detail, the way a driver who understands the rules of the road can handle an unfamiliar intersection.
Online education can deliver this knowledge-based learning effectively while fitting around clinical schedules. A systematic review of online continuing professional development found improvements in knowledge, clinical skills, professional performance, confidence, and other learning outcomes with online and blended formats. Classroom courses from the American Heart Association (AHA) and the American Red Cross remain one valid route, and an employer may still require a specific credential or a hands-on skills check. Those are three separate demands: learning the material, demonstrating physical skills, and meeting workplace requirements.
The questions ahead work like a rehearsal. Read each scenario, choose your answer, then say your reasoning aloud before you check the explanation and the mistake learners most often make.
1. Recognizing Cardiac Arrest and Checking for Responsiveness
Sample question: An adult collapses in a grocery store. The scene is safe, the person doesn't respond to a shoulder tap, and you hear occasional gasps. What should you do?
Answer: Treat this as suspected cardiac arrest. Activate emergency services, arrange for an AED, and begin CPR promptly.
Gasping can mislead rescuers because it looks like breathing. Agonal gasps aren't normal breathing. Don't wait for the person to stop making every sound before acting.
For a lone rescuer who identifies adult cardiac arrest, the AHA adult basic life support guideline recommends activating the emergency response system first, then immediately starting CPR with chest compressions. Use your phone's speaker function when available so you can follow dispatcher instructions without abandoning the person.
Separate recognition from prolonged assessment
A healthcare professional checks breathing and a pulse promptly, without allowing the pulse check to exceed the guideline's ten-second limit. A lay rescuer shouldn't delay compressions trying to locate a pulse.
The initial assessment focuses on responsiveness and normal breathing.
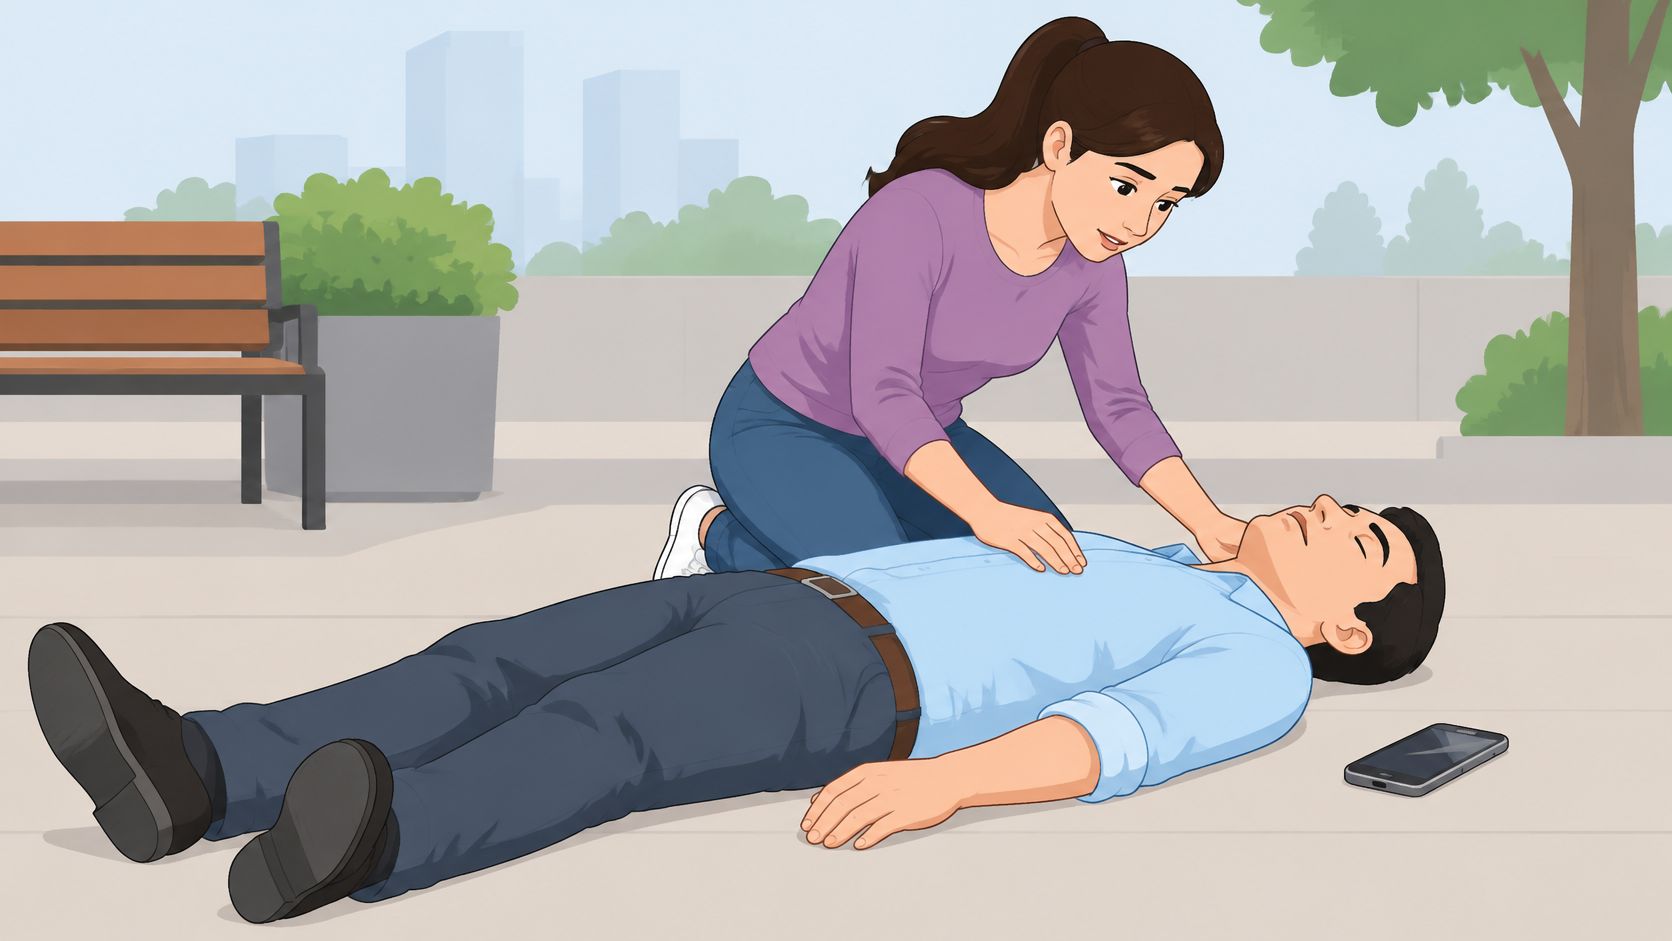
The common mistake: Treating occasional gasping as reassurance, or repeatedly reassessing because you're afraid of making the wrong decision.
Repeatable online study method: Change one feature of the scenario during each review:
- Normal breathing: Explain why an unresponsive person still needs urgent help and monitoring.
- Only gasping: Say aloud that this isn't normal breathing.
- Another rescuer present: Assign that person to call emergency services and retrieve the AED.
Think of recognition like a smoke alarm. You respond to a serious warning rather than waiting for complete certainty.
2. Adult Chest Compression Rate and Depth
Sample question: During adult CPR practice, a rescuer pushes rapidly but barely depresses the chest and keeps leaning between compressions. What needs correction?
Answer: All three elements need work: rate, depth, and recoil. Each compression has to sink deep enough to move blood, and the chest has to spring back fully so the heart can refill before the next push.
The AHA high-quality CPR guidance specifies an adult compression rate of 100–120 per minute, a depth of at least 5 cm (2 inches) while avoiding depths greater than 6 cm (2.4 inches), and complete chest recoil.
Recoil is the part learners most often skip. Count out loud and watch the chest rise fully between pushes. Your hands stay in contact with the chest wall, and your weight comes off it. Even light leaning can keep the chest from returning all the way.
Drill the movement until it feels automatic
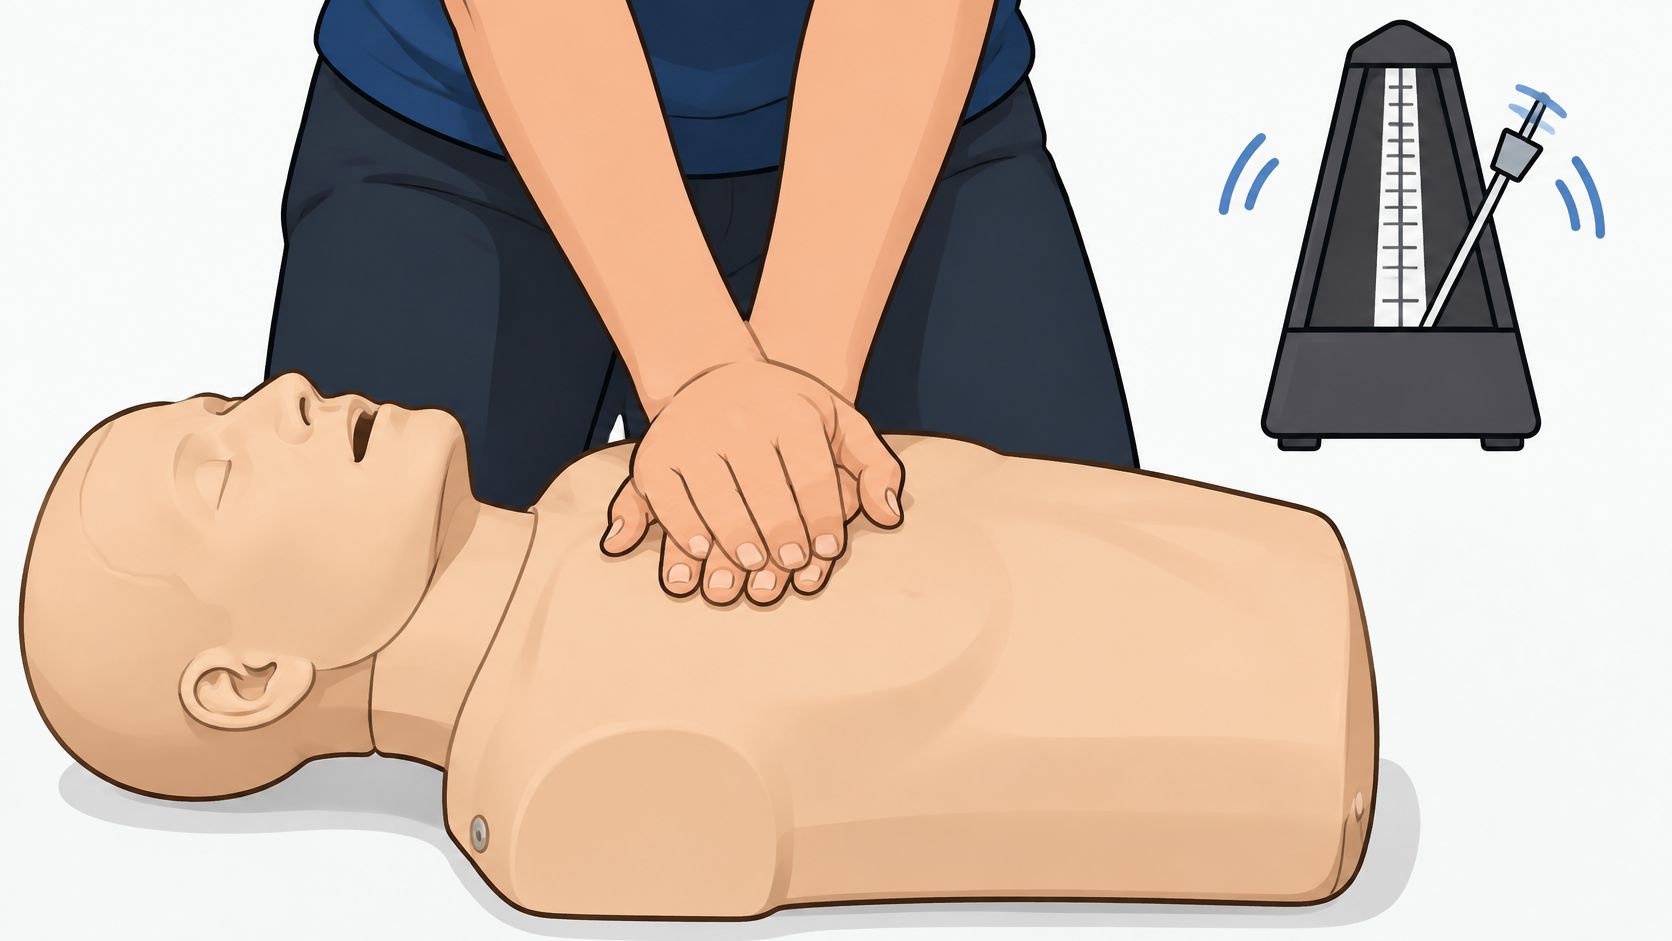
Position the heel of your hand on the center of the chest over the lower half of the breastbone. Put your other hand on top, straighten your arms, and place your shoulders over your hands.
A metronome can help you hold the rhythm during practice.
The common mistake: Choosing the fastest answer because you associate urgency with speed. Pushing too quickly makes it harder to reach adequate depth and let the chest recoil fully.
Practice rule: A metronome helps with timing. A feedback manikin tells you whether your compressions are deep enough and fully released.
Repeatable online study method: Watch a demonstration, pause it, and describe the rescuer's hand position, posture, and release out loud. Then rehearse on a manikin with feedback when one is available. Use training equipment for compression practice, because a healthy person should never receive real compressions.
3. Compression-to-Ventilation Ratios for One and Two Rescuers
Read the patient's age and rescuer count before selecting a ratio. Those details are part of the question, not background information.
Sample question: You're providing conventional CPR to an adult without an advanced airway. Another trained rescuer arrives. Should you automatically change to a pediatric compression-to-breath ratio?
Answer: No. Conventional adult CPR remains 30 compressions followed by 2 breaths, whether one or more rescuers are present.
For children and infants without an advanced airway, two trained rescuers generally use 15:2, and the AHA historical account of resuscitation guidance identifies the adoption of standard compression-to-breath ratios as an important guideline milestone. A lone rescuer generally uses the conventional single-rescuer ratio.
The distinction matters because children's cardiac arrests are more often respiratory in origin. A child who stops breathing effectively can progress to arrest, so two trained rescuers deliver breaths more frequently while sharing the work.
Read the whole scenario before counting
Run three checks in order before you pick a number: the patient's age, the number of trained rescuers, and whether an advanced airway is in place. A second rescuer alone doesn't change the ratio. An adult with two rescuers still gets 30:2, while a child with two rescuers gets 15:2.
Our explanation of the compression-to-breath ratio can help you organize the age-group and rescuer differences.
The common mistake: Memorizing a ratio without attaching it to a patient group, rescuer arrangement, and airway status.
Repeatable online study method: Create digital flashcards with the scenario on the front and the reasoning on the back.
- Adult scenario: State the conventional ratio and explain why another rescuer doesn't automatically change it.
- Pediatric scenario: Identify whether the rescuer is alone or working with another trained person.
- Advanced-airway scenario: Recognize that ventilation timing changes and requires the appropriate algorithm.
During a partner drill, practice the transition as carefully as the counting. Agree on roles before you interrupt compressions.
4. Pediatric and Infant CPR Differences
Size the technique to the patient. Pediatric CPR works like fitting shoes: the same design must match a smaller foot, so the same method comes in a smaller version.
Sample question: You're helping an infant in cardiac arrest. Should you use adult hand placement and adult compression depth?
Answer: No. Match the compression technique and depth to the infant's size and the current pediatric algorithm.
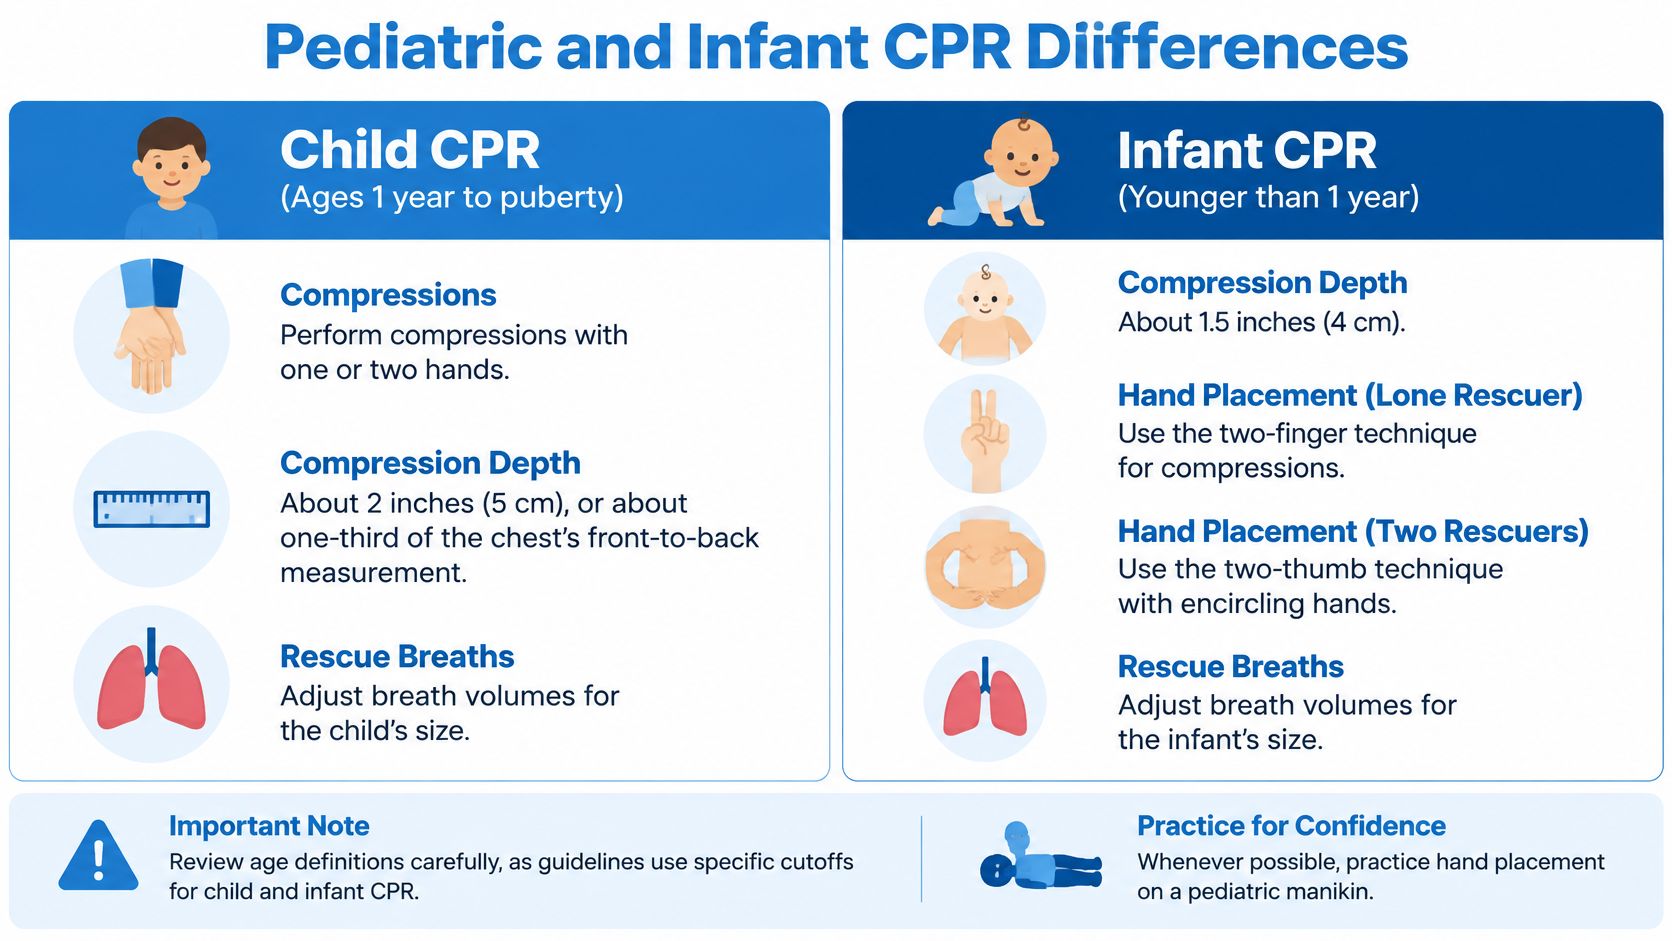
The depth target scales with the patient. The AHA pediatric basic life support guideline sets the usual target at about one-third of the chest's front-to-back diameter, approximately 2 inches (5 cm) for children and 1.5 inches (4 cm) for infants. These age-specific targets prevent the habit of applying one adult measurement to every patient.
Use the comparison graphic to identify differences, then confirm that its technique descriptions match your current course materials.
Check the guideline version
For children, one or both hands may be appropriate depending on size and compression quality. For infants, current teaching emphasizes the two-thumb encircling technique or an appropriate heel-of-hand technique for a single rescuer.
The common mistake: Trusting any image you find online. Illustrations of the old two-finger infant technique still circulate even though recommendations have moved past it.
Repeatable online study method: Use image-based questions to identify the patient group, hand placement, depth principle, and rescuer arrangement. Then rehearse each version on the corresponding pediatric manikin.
During practice, describe what you're checking in each demonstration rather than copying movements without explanation.
For example, a childcare worker practicing infant CPR should explain why the infant technique differs from the technique used on an older child. Explaining the adjustment proves more useful than recognizing a familiar photograph.
5. AED Use and Pad Placement
Sample question: An AED arrives while another rescuer performs CPR. Should you wait until several more CPR cycles are complete before turning it on?
Answer: No. Turn it on promptly, expose the chest, attach the pads, and follow the device's instructions. Keep compressions going while you prepare whenever possible.
An automated external defibrillator analyzes heart rhythm and advises a shock when appropriate. It doesn't replace CPR, and it doesn't shock every person in cardiac arrest.
The need for prompt action is substantial. The AHA CPR facts and statistics page reports that more than 350,000 cardiac arrests occur outside hospitals annually in the United States and states that immediate CPR can double or triple the chance of survival.
Use the pad diagrams as your landmarks
For typical adult placement, one pad goes on the upper right chest. The other goes on the left side below the armpit. Follow the diagrams on the pads rather than relying only on memory.
The training torso shows the usual adult arrangement.
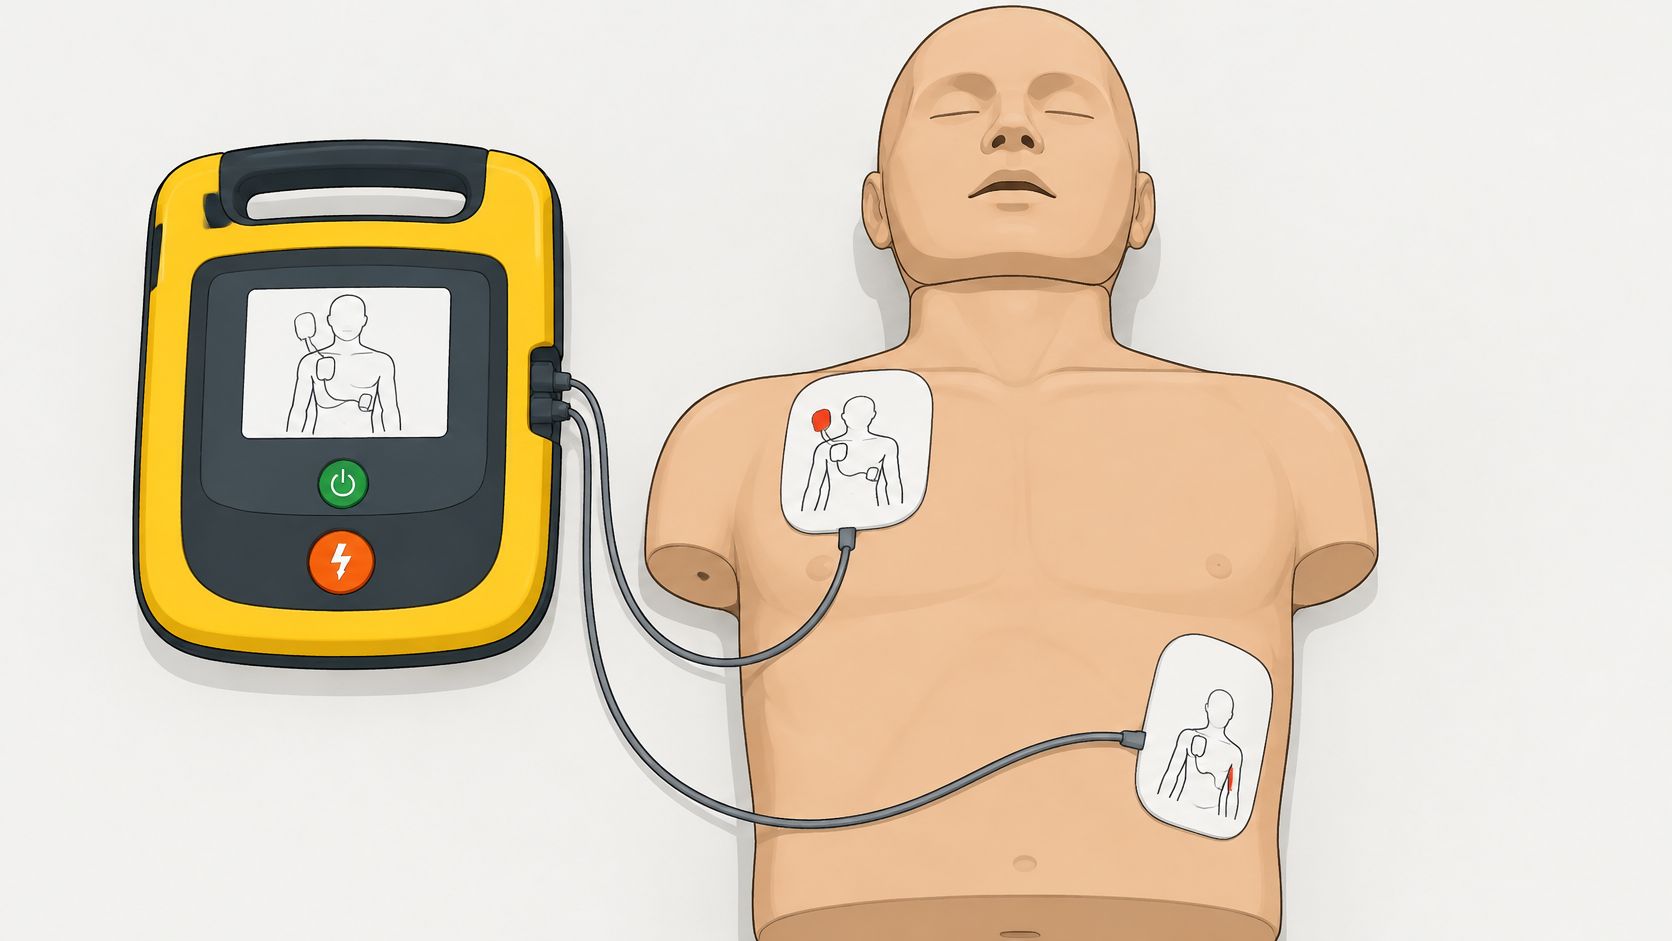
- Prepare the skin: Dry a wet chest. Remove hair only if it prevents the pads from adhering.
- Clear the patient: Nobody should touch the person during rhythm analysis or shock delivery.
- Resume compressions: Restart CPR promptly after a shock or a no-shock instruction, following the AED's prompts.
The common mistake: Interpreting “no shock advised” as “the person no longer needs CPR.”
Repeatable online study method: Pause an AED scenario before each instruction. Say what you'd do next, then check the explanation. Include a small-child scenario where pad size, separation, and pediatric settings require attention.
6. Airway Opening and Rescue Breaths
Air moves only through an open airway. Tilt the head, lift the chin, then check for chest rise.
Sample question: During conventional adult CPR, your first rescue breath doesn't produce visible chest rise. What should you do?
Answer: Reopen the airway, improve your seal, and attempt the next breath. Keep any compression pause short while you correct the problem.
The head-tilt, chin-lift is the standard airway-opening maneuver for most unresponsive patients. A trained healthcare rescuer may use a jaw-thrust when cervical spine injury is suspected.
Under current AHA guidelines, each rescue breath lasts about one second and delivers only enough air to produce visible chest rise. Avoid forceful or prolonged breaths. When a breath fails, your instinct may be to blow harder. Reposition the head first, because extra pressure through a poorly opened airway still leaves the chest still.
Match the maneuver to the situation
In an adult collapse without suspected trauma, tilt the head and lift the chin before giving breaths. If trauma is suspected, a trained rescuer should use the appropriate airway approach while prioritizing oxygenation.
Our explanation of the jaw-thrust maneuver helps distinguish this technique from a head-tilt, chin-lift. If a jaw-thrust doesn't open the airway, follow your training to establish effective ventilation rather than leaving the airway obstructed.
Visible chest rise is your guide. A breath that makes the chest rise is the right size.
The common mistake: Blowing harder when the problem is poor airway position or an incomplete mask seal.
Repeatable online study method: Watch an airway demonstration without sound and narrate the actions. Name the maneuver, describe the seal, and identify the sign of an effective breath.
- Pocket mask practice: Learn the seal and airway position on a manikin.
- Bag-mask practice: Rehearse with trained partners because maintaining a seal can be difficult.
- Failed-breath scenario: Explain how you'd correct positioning without creating a prolonged compression pause.
Never practice rescue breathing on an unresponsive person who is breathing normally.
7. Hands-Only CPR for Untrained Bystanders
You don't have to perform every possible resuscitation skill to provide meaningful help.
Sample question: An untrained passerby sees an adult suddenly collapse at a sporting event. They're unwilling to give mouth-to-mouth breaths. What should they do?
Answer: Activate emergency services, obtain an AED through another bystander if possible, and begin continuous chest compressions with dispatcher guidance.
Hands-only CPR removes rescue breaths from the immediate response for an untrained bystander witnessing a sudden adult or teen collapse. It gives the bystander a clear task instead of a reason to stand back.
Know where the simplified approach fits
Hands-only CPR isn't a universal replacement for conventional CPR. Breaths are particularly important in pediatric arrest, drowning, and other situations involving inadequate oxygen before cardiac arrest. Trained rescuers should follow the algorithm appropriate to the patient and circumstances.
A teenager helping an adult family member can follow dispatcher coaching while another person retrieves an AED. A healthcare professional responding to a child's respiratory emergency needs a different plan.
The common mistake: Turning a helpful adult-bystander message into a rule for every patient.
Repeatable online study method: Sort scenarios into sudden adult collapse, pediatric emergency, and likely oxygen-related arrest. Explain whether compression-only CPR is the appropriate bystander response or whether conventional CPR is needed.
Online learning can support this decision-making, but keep testing your retention. In a randomized educational experiment involving resident physicians, an online tutorial increased mean knowledge scores from 50% before training to 76% immediately afterward, although later testing showed declining retention.
That finding supports repeated review, not abandoning online education. Classroom attendance alone doesn't eliminate forgetting either. Return to scenarios after a break, and answer from memory before reopening the explanation.
8. Team Roles, Minimizing Interruptions, and Rotating Compressors
Sample question: During a team resuscitation, the compressor becomes tired, the AED operator asks everyone to stop early, and nobody has been assigned ventilation. What should the team leader correct?
Answer: Assign clear roles, coordinate the compressor change, and avoid unnecessary interruptions.
A code team works like a pit crew: speed comes from each person owning one job at the right moment. In a small group, one rescuer may cover two tasks, but the leader still names who compresses, who manages the airway, who runs the AED, and who keeps time.
Make handoffs predictable
Use a short script: name the compressor, confirm the instruction, then switch. Rotate compressors approximately every two minutes, or sooner if fatigue lowers compression quality, using the timing in our guide to when team roles should alternate to avoid fatigue. Have the replacement ready before the current compressor stops, and match the switch to a required pause when possible.
- Name the person: Give a task to a specific teammate instead of calling it into the room.
- Confirm the task: Have the teammate repeat the instruction.
- Prepare the transition: Position the replacement compressor before the handoff.
- Report completion: Tell the leader when the AED is attached or another assigned action is finished.
The common mistake: Adding rescuers without assigning jobs. Extra hands can crowd the patient, duplicate AED steps, and leave ventilations or timing unclaimed.
Repeatable online study method: Run a video-call scenario and assign roles. Pause at each transition and explain how you would keep the interruption brief.
The AHA resuscitation education executive summary supports feedback devices, deliberate practice, spaced learning, and debriefing. Build those tools into both individual technique and team coordination.
Team insight: Finish a drill by naming a specific action to repeat and a specific action to change.
Key targets and common mistakes for each basic CPR test topic
Use this section as a final pass, not another read-through. Every exam scenario lands somewhere on the same chain of decisions, so practice running the chain in order. When a question trips you up, name the step where it caught you.
The decision order most test items follow:
- Check the scene, then the person. Tap, shout, and look for normal breathing. Gasping counts as abnormal, so treat it as cardiac arrest instead of waiting for certainty.
- Activate help first. Call emergency services or send someone to do it, and get an AED on the way before compressions start.
- Match compressions to the victim. Adults, children, and infants each have their own depth and hand technique. The trap is applying adult depth or a two-hand grip to a small chest, or forgetting that smaller victims need proportionally shallower compressions.
- Choose the ratio by rescuer count. Alone, you use the same compression-to-breath pattern for every age. When a second trained rescuer joins, only children and infants switch to a pattern with fewer compressions between breaths. Adult compressions keep their rhythm either way.
- Let the AED lead. Place pads as the diagrams show, stay clear during analysis and shock, then restart compressions immediately. The tempting wrong answer usually has you pause to check for a pulse first.
- Keep breaths small and gentle. Watch for visible chest rise rather than forcing air in. If a bystander is untrained or unwilling to give breaths, continuous compressions alone still help an adult victim, though children, infants, and drowning victims still need ventilations.
- Share the work before fatigue sets in. Swap compressors before depth drops, and time each handoff to a pause you already need, like AED analysis.
Turn it into practice: Take each question you miss and point to the step it targets. If the same branch keeps tripping you, drill that step alone until the choice feels automatic. That is how a flat list of targets becomes a response you can run under pressure.
Turn Practice Into Confidence Before Your Next CPR Exam
Pull up your last practice attempt and find the questions you missed. Each one points to a decision you still need to strengthen, so start there instead of rereading material you already know.
The most useful practice is explaining your reasoning. Say why your answer fits the scenario and why the alternatives would delay or weaken care. If you cannot explain the difference, revisit that concept before attempting another question.
Build a review routine you can repeat
Use short study sessions focused on the questions you miss. Return later and answer without looking at your notes, then verify both your answer and your reasoning.
A systematic review and meta-analysis of spaced digital education found better post-intervention knowledge and knowledge retention with spaced online learning. The practical lesson is straightforward: distribute your review instead of relying on a single long session before the exam.
Pair that knowledge work with hands-on practice. A CPR refresher-training study in JMIR Medical Education assessed written knowledge separately from manikin-measured compression depth, rate, and recoil. Knowing the right technique and performing it are separate abilities, like the written and road portions of a driving test. You need both.
- Review the explanation: Identify the patient detail that determined the answer.
- Practice the skill: Use a manikin and feedback where available.
- Keep your records: Store your completion documentation where you can retrieve it for credentialing.
- Confirm workplace fit: Match your credential and any required skills assessment to your role.
Organized records prevent avoidable administrative problems, and guidance on handling course completion records can help you keep evidence of training in one place. Some employers require a specific credential or an in-person skills check, so confirm what your workplace expects before your exam date.
ProMed Certifications keeps its certification protocols AHA-aligned, with curricula authored by Board-Certified Emergency Physicians and subject matter experts. If you do not pass, you can relaunch the exam at any time, and a new set of questions is generated for each attempt. The CPR, AED and First Aid Certification covers adult, child, and infant CPR and AED use, and recertification costs $35. Use your next practice attempt to identify what needs attention, then rehearse until the reasoning feels clear and the physical response becomes reliable.
ProMed Certifications offers self-paced online medical certification courses and practice tests to help you review CPR decisions around your schedule. Visit ProMed Certifications to choose your training, work through practice questions, and prepare for your next certification or recertification exam.

Stay compliant with ProMed+
Certifications included: ACLS, BLS, PALS, CPR & Neonatal Resuscitation
Unlimited continuing education: over 200 hours of accredited CME
All-inclusive: One price. No surprises.
Get certified today

The Advanced Cardiac Life Support (ACLS) is an accredited online medical certification course that teaches medical professionals to respond to nearly all cardiopulmonary emergencies.

The Pediatric Advanced Life Support (PALS) Recertification instructs medical professionals on performing pediatric cardiopulmonary resuscitation in emergencies.

The Basic Life Support (BLS) Recertification is intended to teach healthcare professionals the basic steps of CPR and rescue breathing for adults, children, and infants.

Our online medical certification course for CPR, Automated External Defibrillator (AED), and First Aid is designed to teach adult, child, and infant CPR and AED use.

The Neonatal Resuscitation Certification trains medical professionals in performing resuscitation procedures and life-saving techniques for newborns at the time of delivery.