


Oral Airway Size Guide for Correct Selection
.png)
You're at the bedside with a patient who needs airway support, and the available oropharyngeal airways look almost identical except for their color and length. Choosing the first one that seems close can create a new problem instead of solving the original obstruction. Oral airway size affects whether the tongue is displaced, whether ventilation improves, and whether the device causes gagging or soft-tissue injury.
This guide treats sizing as a clinical judgment, not a memorized color chart. You'll learn what a Guedel airway does, how to measure it, why the mouth-to-mandible landmark is only an estimate, and how to confirm fit through immediate bedside checks. The same skill can be reinforced through flexible online continuing education, which makes airway learning easier to revisit around clinical schedules.
Introduction to Oral Airway Sizing and Why It Matters
An oropharyngeal airway, often called an OPA or Guedel airway, helps maintain an open upper airway in an unconscious patient who has no gag reflex. It creates a channel past the tongue so air can move toward the pharynx during spontaneous breathing or bag-mask ventilation. The device doesn't replace positioning, suction, oxygenation, or ongoing assessment. It supports those actions when the tongue is contributing to obstruction.
The practical challenge is that an OPA must be long enough to move the tongue forward without extending too far. A device that's too short may rest against the tongue and leave the obstruction unchanged. A device that's too long can push soft tissue into an unfavorable position, irritate the pharynx, or provoke gagging when protective reflexes are present.
Why the first choice matters
Think of the airway as a narrow doorway partly blocked by a heavy curtain. The OPA acts like a small spacer that holds the curtain away from the opening. A spacer that's too short won't reach the curtain. One that's too long may press against the back wall instead of creating a clean passage.
Before insertion, assess consciousness, protective reflexes, breathing, and the need for airway support. An OPA is generally intended for an unconscious patient without a gag reflex. If the patient is awake or reacts with gagging, stop and reassess rather than forcing the device.
After insertion, the meaningful question isn't whether the airway looked correct in your hand. It's whether the patient now has a patent airway and effective ventilation. Look for visible chest rise, less upper-airway obstruction, and improved bag-mask ventilation. If those findings don't improve, remove the device and reassess the size, position, airway opening maneuver, and need for another airway strategy.
A skill that fits modern learning
You don't need to rely only on a single classroom demonstration to maintain this knowledge. Peer-reviewed reviews support online learning as a valid way to develop and refresh healthcare knowledge and skills. A systematic review of 59 studies found online eLearning equivalent, and possibly superior, to traditional learning, while a Cochrane review found Internet-based e-learning at least as effective as traditional approaches for healthcare professional behavior and superior to no instruction (systematic review of online learning in health professions education, Cochrane review of Internet-based e-learning).
What an Oropharyngeal Airway Is and How It Works
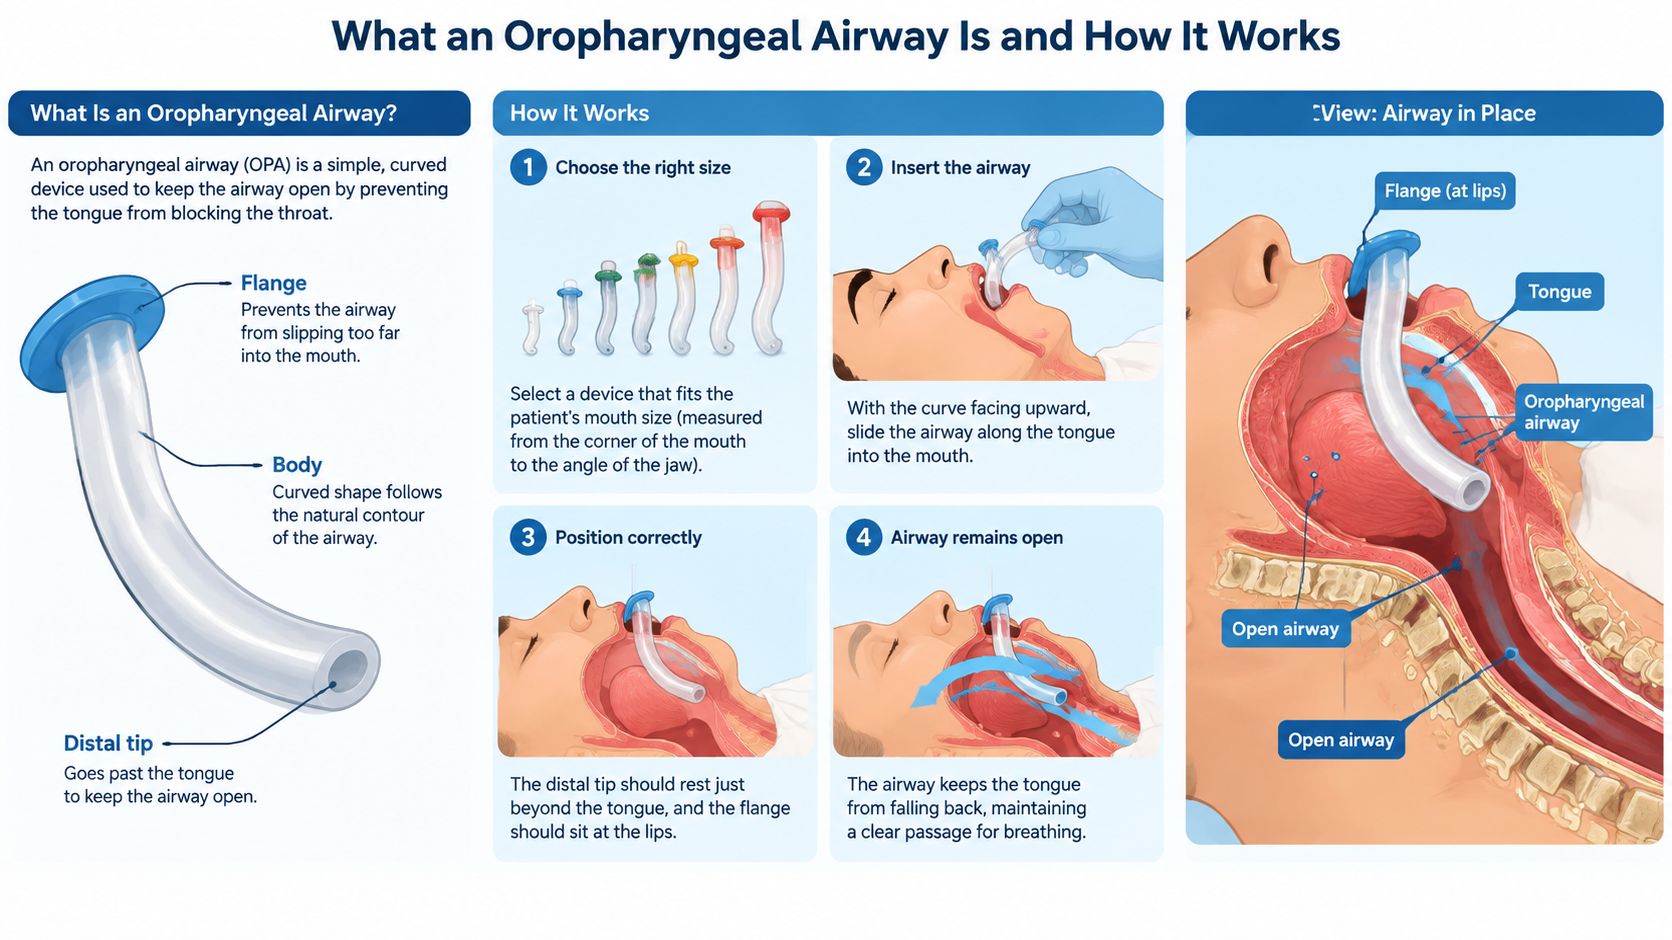
A patient with lost airway muscle tone may let the tongue fall backward and narrow the passage. An oropharyngeal airway, or OPA, creates space between the tongue and palate so air can pass toward the pharynx.
The Guedel airway has several parts, each with a practical role:
- Flange: The broad outer piece rests at the lips and helps keep the device from sliding into the mouth.
- Bite block: The firm section helps preserve the channel if the patient bites down.
- Curved body: The curved tube follows the general path of the tongue and palate.
- Distal tip: The far end sits toward the oropharynx and helps hold the tongue away from the posterior pharyngeal wall.
The device works like a tongue retractor with a built-in air channel. It does not pull the tongue forward actively. Instead, it occupies the space that the tongue could otherwise seal when muscle tone is absent. The flange remains outside the mouth, while the curved body and distal tip extend inward.
OPA versus other airway devices
An OPA enters through the mouth and suits a patient who cannot protect the airway and has no gag reflex. A nasopharyngeal airway enters through the nose and may be considered when an oral device is not tolerated, after assessing nasal trauma, facial injury, and other contraindications under local protocols.
An OPA also differs from a supraglottic device. A laryngeal mask airway sits above the glottis and provides a different level of support. Review this resource on laryngeal mask airway placement for related placement and airway-support concepts.
An OPA cannot correct every obstruction. Secretions, swelling, blood, laryngospasm, foreign bodies, and lower-airway disease may still impair ventilation. Suction, repositioning, oxygen delivery, and escalation may remain necessary.
For learners building an emergency foundation, CPR AED & First Aid Certification is described by ProMed Certifications as a 100% online certification for CPR, AED, and First Aid, with review material, an exam, and card delivery described as available in as quick as one hour or less.
How to Measure for Correct Oral Airway Size
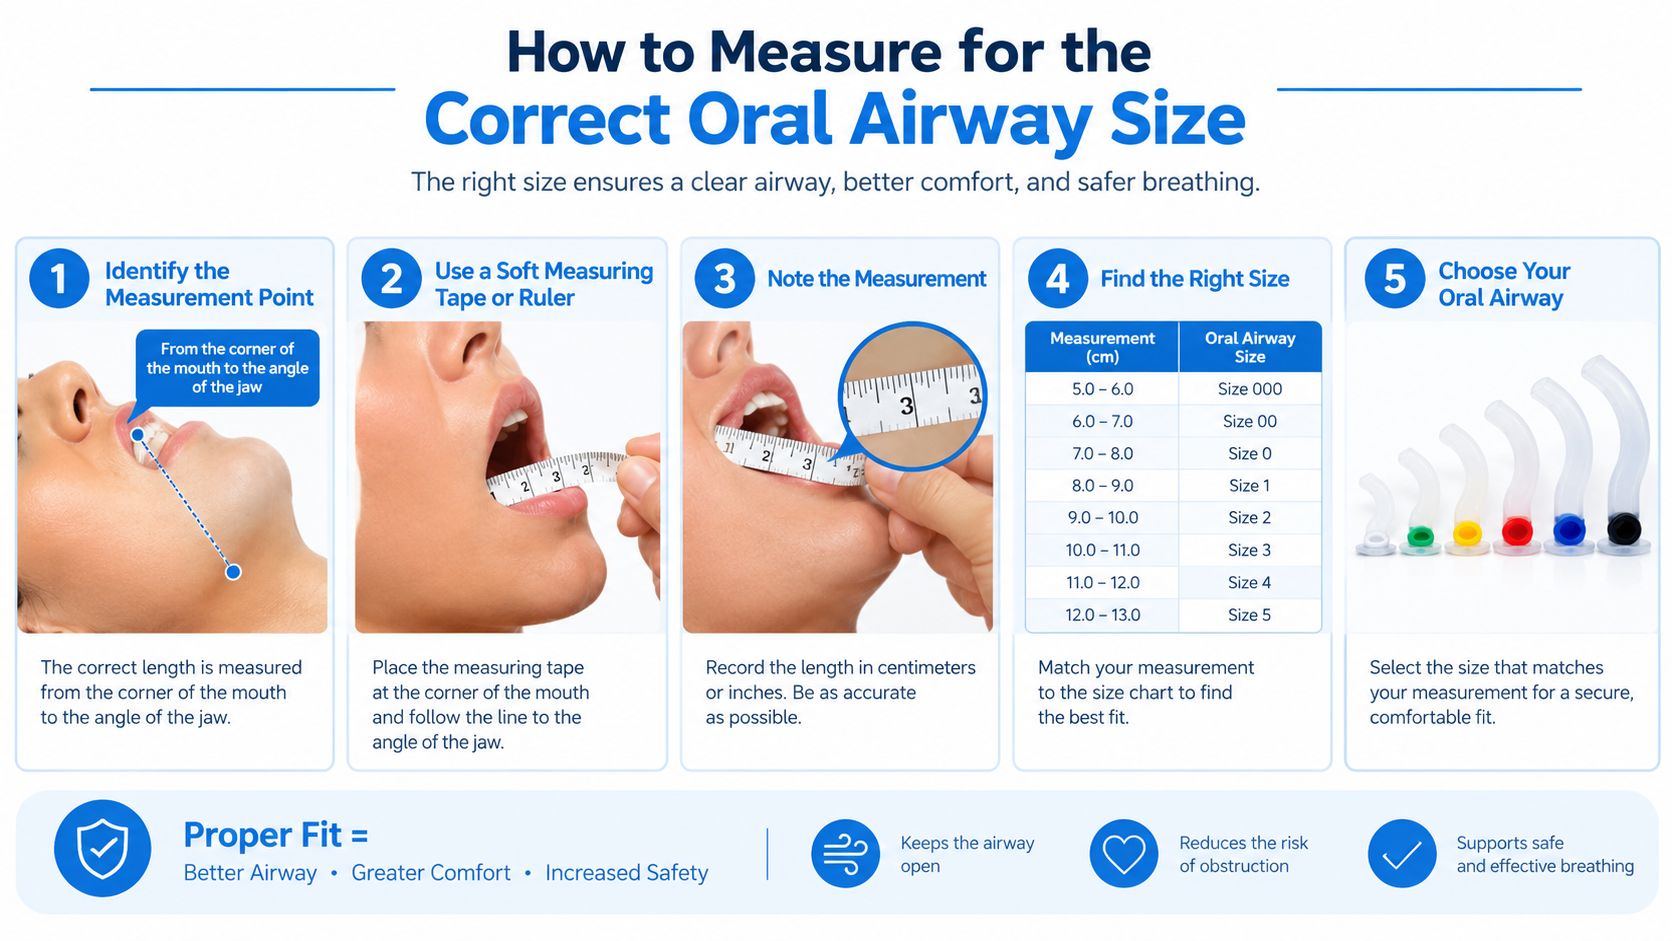
The standard bedside estimate uses the patient's facial landmarks. You can measure from the corner of the mouth to the angle of the mandible, or from the maxillary incisors to the angle of the mandible. Both methods aim to estimate the distance the device must travel.
Start with the patient positioned appropriately for airway assessment and ventilation. Open the mouth carefully, identify the flange end of the airway, and place that end at the corner of the mouth or upper incisors. Align the distal tip with the angle of the mandible. The selected device should reach that landmark without extending beyond it.
A repeatable bedside method
Use the measurement as a deliberate sequence rather than a quick glance:
- Assess suitability: Confirm that an OPA is appropriate and that the patient has no gag reflex.
- Choose a nearby size: Select an airway that appears close, while keeping the next size available.
- Align the flange: Place the flange at the mouth corner or upper incisors.
- Compare the tip: Check whether the tip reaches the mandibular angle.
- Prepare to verify: Treat the result as an estimate and reassess after insertion.
Facial structure can make the angle of the mandible difficult to identify. Palpate gently when appropriate, use the patient's midline and jaw contour as guides, and compare two adjacent airways if the choice is uncertain. Don't force precision from a landmark you can't confidently locate.
Why stock matters
A single airway size isn't a universal solution. Keep several sizes immediately available, especially when caring for mixed adult and pediatric populations. The best selection is often the device that matches the landmark and then produces effective ventilation, not the one that looks most familiar.
Oral Airway Size Chart by Age Weight and Length
A patient may look like an average adult, yet the airway that fits best may be one size smaller or larger than expected. Manufacturers commonly organize oral airway sizes from 40 mm to 110 mm, covering newborn through extra-large adult use, with many options increasing in 10 mm steps, per the NCBI Bookshelf overview of oropharyngeal airways.
Use the chart as a starting point, not as a final prescription. Measure from the mouth toward the angle of the mandible, then check whether the inserted device supports ventilation. Weight offers only a rough guide because body size does not directly determine airway length, especially when facial proportions differ.
Oropharyngeal Airway Size Reference by Patient Category
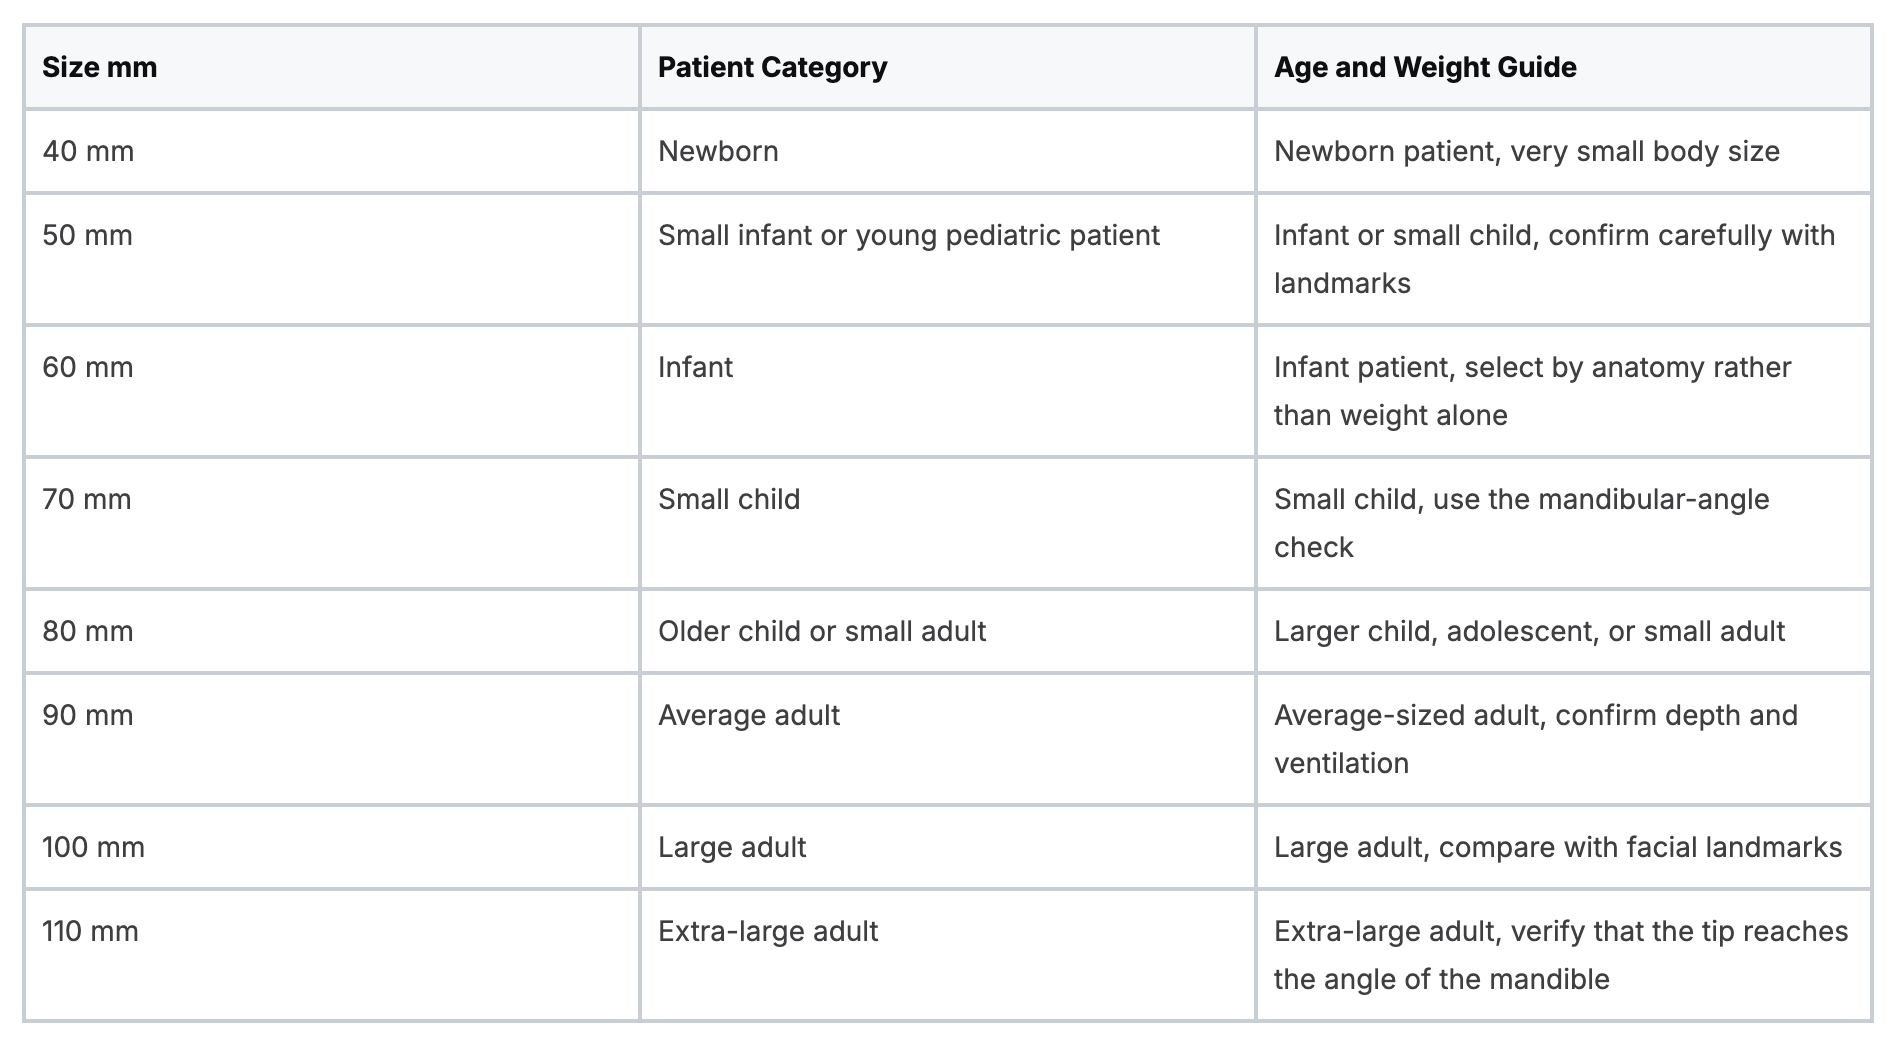
Color coding can speed identification, but it is not a universal sizing system. If a manufacturer's color suggests one option while the measured mouth-to-mandible distance suggests another, follow the measured length and then verify the fit clinically. Check the packaging or device markings before relying on color, since conventions vary between manufacturers.
Many commercial OPA ranges provide 8 to 9 discrete sizes, so an airway cart should keep adjacent options available. Having the next size ready prevents a delay when the first choice reaches too far, fails to lift the tongue, or does not improve ventilation, as noted in the same NCBI reference.
How to use the chart under pressure
Start with the likely patient category, compare the airway with the face, and keep the neighboring size within reach. If age and body size point in different directions, give greater weight to the landmark and the patient's response. Pediatric airways deserve particular care because a device that appears close can still be too short or too deep.
The chart supports a quick first choice. The bedside response makes the final decision. After insertion, look for chest rise, less upper-airway obstruction, and improved ventilation. If those findings do not improve, reassess the size, position, and need for an alternative airway rather than defending the original selection.
Why Landmark Measurement Is an Estimate Not a Guarantee

You measure from the mouth corner to the angle of the mandible, select the closest OPA, and still see poor airflow after insertion. The measurement gave you a sensible starting point, not proof that the airway will work.
The mouth-to-mandible method is useful because it replaces guessing from color or body size with a physical reference. Its result can change with the starting point, the difficulty of locating the mandibular angle, and each patient's facial proportions. In one adult study, different landmark techniques changed the estimated airway size by 2 to 3 cm in the same patient (study comparing oral airway measurement techniques). That distance may shift the choice to an adjacent OPA size.
Pediatric anatomy adds uncertainty
Children show the limitation clearly. A pediatric study reported proper sizing in 47.9% of cases, with 23.4% undersized and 28.7% oversized devices, as reported in the same measurement-technique study. The landmark remains useful, but only as a first approximation.
Two children with similar age or body size may have different jaw relationships, facial depth, and oral dimensions. Even in one patient, measuring from the mouth corner versus the incisors can produce different results.
Practical rule: Measure first, insert carefully, and let ventilation determine whether the choice worked.
The clinical check completes the estimate
A correct measurement cannot guarantee a useful clinical result. After placement, assess the airway as a working system. Persistent obstruction may reflect an OPA that is too short or too long, poor positioning, secretions, or a patient who needs another airway approach.
An adult benchmark study found optimal Guedel airway sizes clustered around size 8 for women and size 9 for men when ventilation and endoscopic view were used as outcome measures (adult Guedel airway sizing study). The landmark identifies where to begin. Chest movement, airflow, and reduced obstruction show whether that choice is working.
Insertion Technique and Bedside Verification Checks
A patient may have a reasonable landmark measurement yet remain obstructed after the OPA is placed. Begin by opening the mouth and checking for secretions, blood, dentures, or foreign material. Suction when indicated, then position the head and jaw according to the patient's condition and local protocol. An OPA supports these steps. It does not replace them.
For an adult, insert the airway with its curve facing upward, then rotate it as it advances. This lets the distal end follow the tongue and palate rather than catching on the tongue. In a small child, rotate cautiously because the movement can injure tissue or push the tongue backward. Direct insertion under visualization with a tongue depressor is commonly taught for children. Follow age-specific training and institutional procedure.
What a well-seated airway looks like
The flange should rest at the lips, with the airway centered in the mouth. The patient should not gag or show returning protective reflexes. If the teeth contact the bite block, check that the device is not being forced against the incisors or causing trauma.
Use a brief verification loop immediately after placement:
- Chest rise: Look for chest movement during spontaneous breathing or assisted ventilation.
- Air movement: Listen and feel for improved airflow through the mouth.
- Obstruction sounds: Recheck snoring, gurgling, and other upper-airway sounds.
- Ventilation: Note whether bag-mask delivery feels easier and produces better chest movement.
- Patient response: Remove the OPA if gagging or vomiting risk develops.
If obstruction continues, do not push the airway farther. Remove it, reassess the size and position, and consider another airway maneuver. The jaw thrust maneuver may help maintain airway opening when cervical spine precautions apply, depending on the clinical situation and training protocol.
Sizing is part of a continuous loop
Use the sequence estimate, insert, verify, adjust. The mouth-to-mandible landmark identifies a starting size, much like using a rough shoe measurement before checking the actual fit. Chest movement, airflow, reduced obstruction, and ease of ventilation provide the bedside confirmation.
For clinicians reviewing advanced resuscitation skills, ACLS Certification is presented by the provider as an online course that fits around a busy schedule, with same-day exam completion and digital card delivery. Online education can support continuing education and certification when it meets employer, credentialing-body, or local regulatory requirements.
Common Sizing Errors and How to Avoid Them
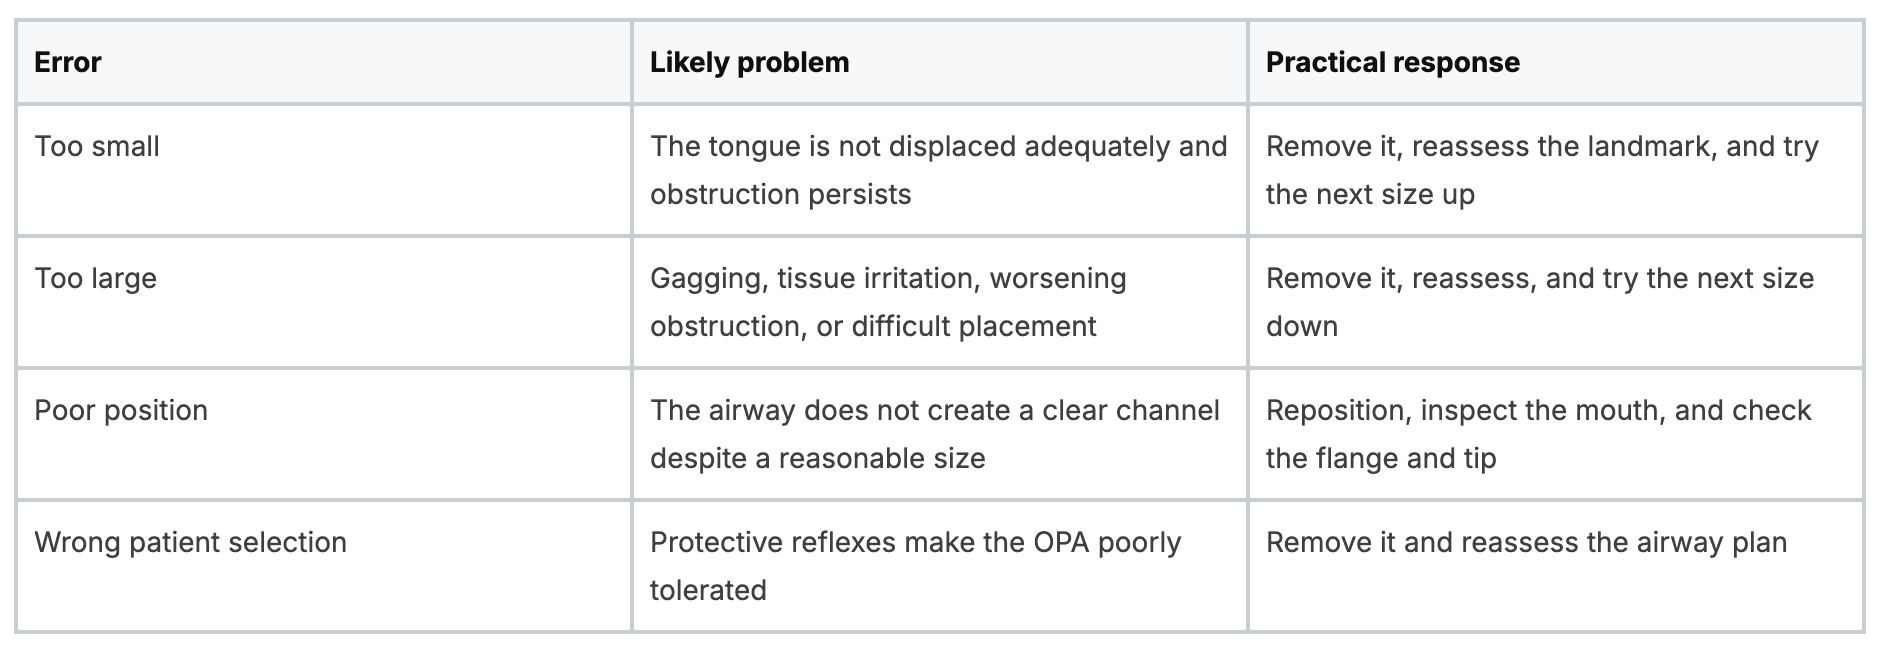
During airway placement, the flange may look correct while the patient still obstructs. That mismatch is a useful warning: the mouth-to-mandible landmark gives an initial estimate, not proof of fit. The main errors are under-sizing and over-sizing, and each produces a different bedside pattern.
An undersized airway may not reach far enough to move the tongue forward. Although the flange rests at the lips, the distal tip remains too shallow. Snoring or other obstruction may continue, chest movement may remain poor, and bag-mask ventilation may still feel difficult.
An oversized airway may extend too far or press on pharyngeal tissue. It can worsen obstruction, cause irritation, or trigger gagging, coughing, and resistance. Stop rather than applying more force. Remove the device, reassess the landmarks and patient response, then choose another size if indicated.
Under-sizing versus over-sizing
Use the patient's response as feedback
Age, height, weight, and apparent body size can guide the first choice, but they cannot confirm the fit. A smaller adult may need a different device than the usual adult category suggests. A child may also fall between chart-based choices. Use the chart from the earlier sizing section to select a starting point, then confirm function at the bedside.
Keep adjacent sizes together and audit the airway cart during each shift. Check that the next smaller and larger options are present, clean, intact, and easy to reach. This simple check exposes gaps before an airway emergency forces a rushed choice.
A device that does not improve ventilation is not successful, even when the measurement appears reasonable.
Re-measure when the landmarks are unclear. Recheck placement after repositioning. If the OPA repeatedly fails to improve ventilation, stop treating size as the only problem and reassess the entire airway plan.
Quick Reference and Related Airway Resources
Use this checklist before you treat an OPA as ready for clinical use:
- Confirm indication: The patient is unconscious and lacks a gag reflex.
- Inspect the mouth: Address visible secretions, blood, dentures, or foreign material as appropriate.
- Measure: Align the flange at the mouth corner or maxillary incisors and compare the tip with the angle of the mandible.
- Keep alternatives ready: Have the adjacent size available.
- Insert carefully: Avoid pushing the tongue backward, especially in pediatric patients.
- Verify immediately: Check chest rise, airflow, obstruction sounds, and ventilation.
- Adjust promptly: Remove and resize if the airway doesn't improve function.
- Escalate appropriately: Consider suction, a nasopharyngeal airway, bag-mask optimization, a supraglottic airway, or advanced airway management according to the patient's needs and your scope.
OPA sizing is one part of a larger airway sequence. You may also need to review nasopharyngeal airway selection, bag-valve-mask technique, two-person ventilation, suctioning, oxygen delivery, and recognition of a failed airway. A related overview of advanced airway options and best practices can help connect these skills without treating one device as a universal answer.
Airway education also benefits from repetition. A meta-analysis of 126 studies found large gains for Internet-based learning compared with no intervention in knowledge, skills, and learner behavior or patient effects, while comparisons with non-Internet methods showed small and generally similar effects (meta-analysis of Internet-based learning in health professions education). A later systematic review of 93 studies found online digital education and blended learning may be equivalent to self-directed or face-to-face learning across knowledge, skills, attitudes, satisfaction, practice change, and patient outcomes (systematic review of digital education for physicians).
That evidence supports a practical conclusion. Online CE and certifications aren't automatically inferior because they aren't held in a classroom. They can offer flexible review, time efficiency, and convenient access while preserving meaningful educational outcomes. The belief that only in-person AHA or American Red Cross classes are valid isn't universally true. Acceptance depends on the specific employer, regulator, accrediting requirements, and course standards.
For readers interested in the broader relationship between oral structures and breathing, a dental resource on Scottsdale sleep apnea oral appliance therapy provides additional context about oral appliances and sleep-related airway concerns. That topic is different from emergency OPA use, but understanding the distinction helps prevent confusion between temporary airway support and longer-term treatment.
Practice the measurement on available airway equipment, keep the chart accessible, and make verification part of every insertion. ProMed Certifications offers online healthcare certification and continuing education options that let clinicians study at their own pace, including courses related to CPR and advanced resuscitation skills. Visit ProMed Certifications to explore flexible training that can reinforce the airway assessment, ventilation, and emergency response knowledge you use at the bedside.
.avif)
Stay compliant with ProMed+
Certifications included: ACLS, BLS, PALS, CPR & Neonatal Resuscitation
Unlimited continuing education: over 200 hours of accredited CME
All-inclusive: One price. No surprises.
Get certified today

The Advanced Cardiac Life Support (ACLS) is an accredited online medical certification course that teaches medical professionals to respond to nearly all cardiopulmonary emergencies.

The Pediatric Advanced Life Support (PALS) Recertification instructs medical professionals on performing pediatric cardiopulmonary resuscitation in emergencies.

The Basic Life Support (BLS) Recertification is intended to teach healthcare professionals the basic steps of CPR and rescue breathing for adults, children, and infants.

Our online medical certification course for CPR, Automated External Defibrillator (AED), and First Aid is designed to teach adult, child, and infant CPR and AED use.

The Neonatal Resuscitation Certification trains medical professionals in performing resuscitation procedures and life-saving techniques for newborns at the time of delivery.

.png)
.png)
.png)