

Mastering CPR with bag valve mask: 2026 Guide
.png)
You’re at the bedside. The monitor is alarming, compressions have started, and someone hands you the bag valve mask. This is one of those moments when a basic skill stops feeling basic.
CPR with bag valve mask looks simple from across the room. Up close, it’s a coordination task. You need airway position, mask seal, timing, chest rise, and calm hands, all at once. New clinicians often think the hard part is squeezing the bag. Usually, the hard part is everything around the squeeze.
That’s why this skill deserves more than a quick checklist review. If you understand the equipment, the mechanics, and the common failure points, you’re far more likely to provide useful ventilation instead of just going through the motions.
Why BVM Proficiency Is a Non-Negotiable Skill
In cardiac arrest care, ventilation quality matters. Not abstractly. Directly.
A landmark 2023 study in Circulation found that when out-of-hospital cardiac arrest patients received measurable lung inflation in at least half of the BVM ventilation pauses, their chances of survival to hospital discharge and survival with a favorable neurological outcome were up to four times greater (Circulation study on BVM ventilation during CPR). That should change how you think about bag-mask technique.
Why this skill gets missed
Many learners are taught BVM as a short station in a larger CPR course. They practice a seal on a manikin, deliver a few breaths, and move on. In real events, though, the patient may have a difficult face shape, secretions, poor jaw tone, or an awkward position on the floor.
Those details are why competent ventilation often separates experienced responders from hesitant ones.
A few things are happening at once during cpr with bag valve mask:
- Chest compressions must stay the priority
- Ventilation pauses must stay efficient
- The airway has to stay open
- The mask has to seal well enough to move air into the lungs, not out around the face
Practical rule: If you don’t see chest rise, don’t assume the bag is “working.” Recheck the airway position, the mask seal, and whether you’re lifting the jaw into the mask.
BVM is a core resuscitation skill, not an advanced extra
New clinicians sometimes assume advanced airways are always better. That mindset can make people underestimate basic airway skills. In practice, basic ventilation done well can be decisive during the earliest phase of resuscitation.
It also matters outside full cardiac arrest. If you need a quick refresher on the difference between arrest states and immediate response priorities, this guide on what to do if someone has a respiratory arrest is a useful companion.
Good training doesn’t have to happen in a classroom
This is also where healthcare education has changed. The old idea that only in-person training is legitimate no longer matches how clinicians learn. High-quality online certification and CE formats can teach the concepts, sequence, troubleshooting logic, and guideline-based decision-making just as effectively as a traditional classroom, especially for busy professionals who need flexible review and repetition.
For BVM use, that flexibility matters. You learn the mechanics, revisit the weak points, and return to the material when you need it. That’s often better than a single live class you barely have time to attend.
Choosing and Preparing Your BVM Equipment
Before you ventilate anyone, you need to know what you’re holding. A BVM setup isn’t complicated, but confusion about parts, assembly, or sizing can slow you down at the worst time.
The device has one job. Move air into the lungs safely and consistently. Every part supports that job.
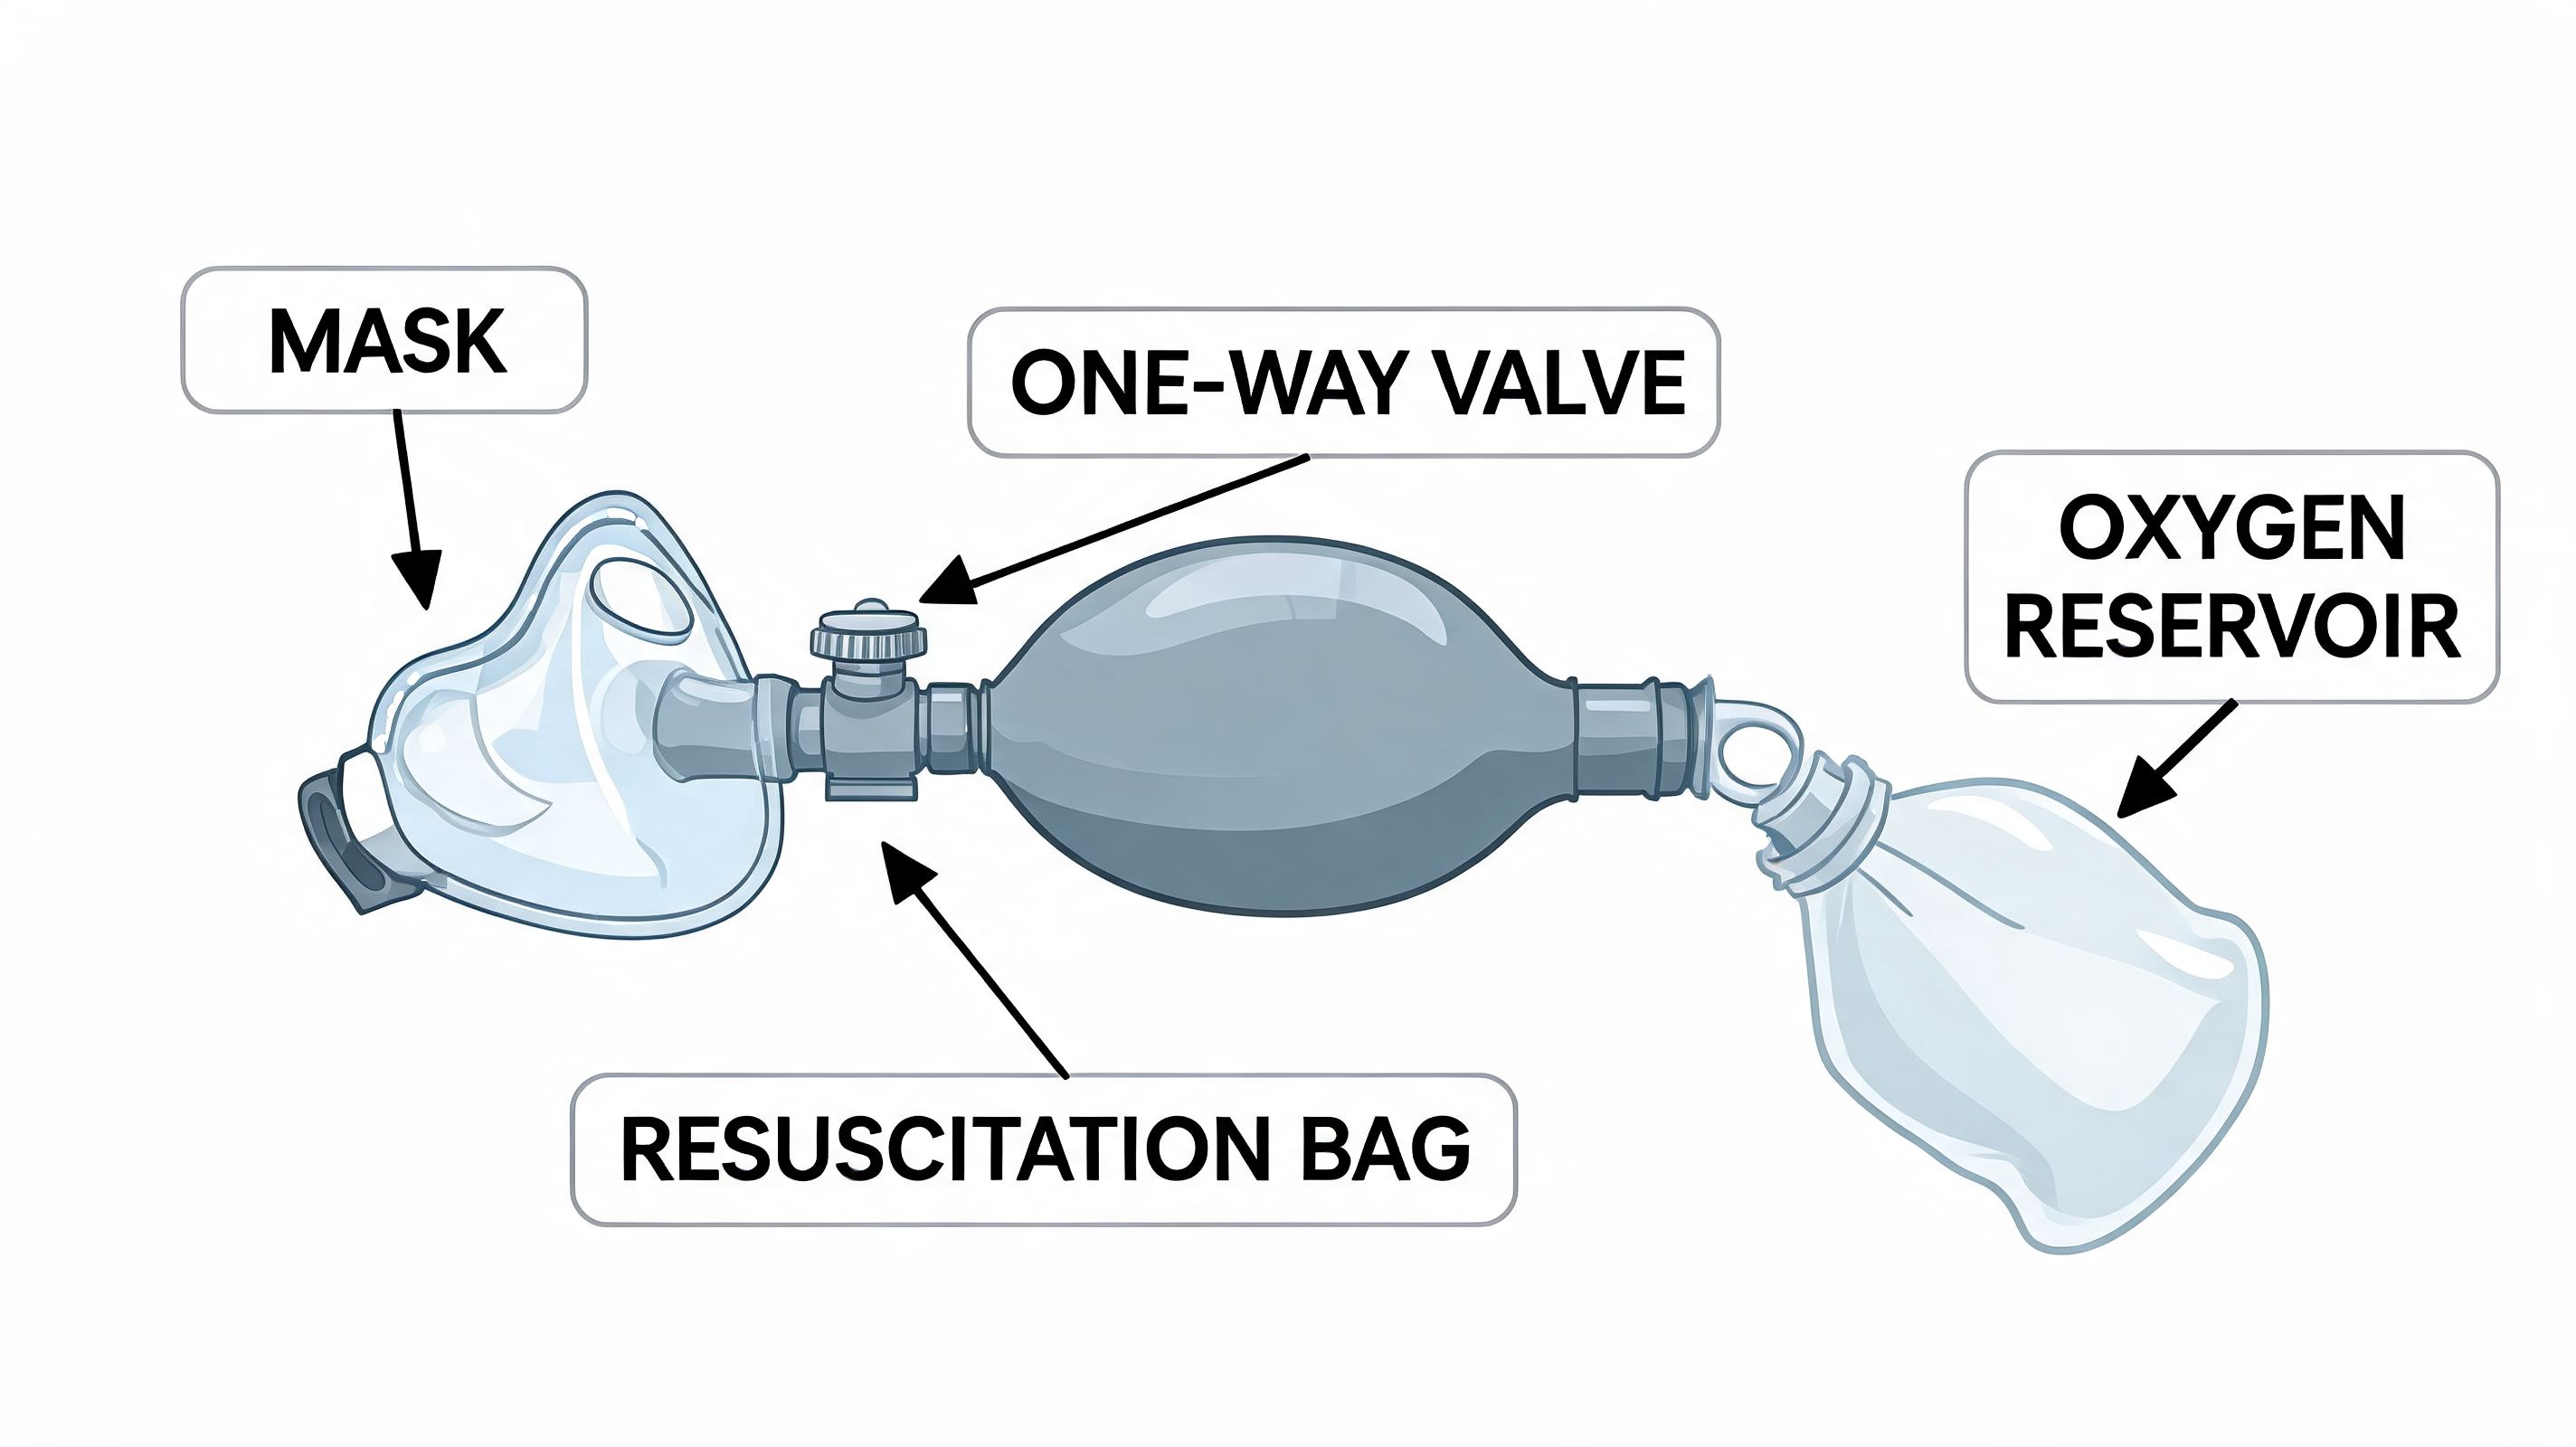
Know the core parts
When you pick up a BVM, identify these components first:
- Self-inflating bag. This is the compressible part you squeeze to deliver a breath.
- Mask. This sits over the patient’s nose and mouth and creates the seal.
- Patient valve. This directs airflow toward the patient and helps prevent exhaled air from returning into the bag.
- Oxygen reservoir and tubing. If oxygen is available, these attachments support higher oxygen delivery.
If you can name each part quickly, you’re less likely to fumble when someone asks you to set up or swap equipment.
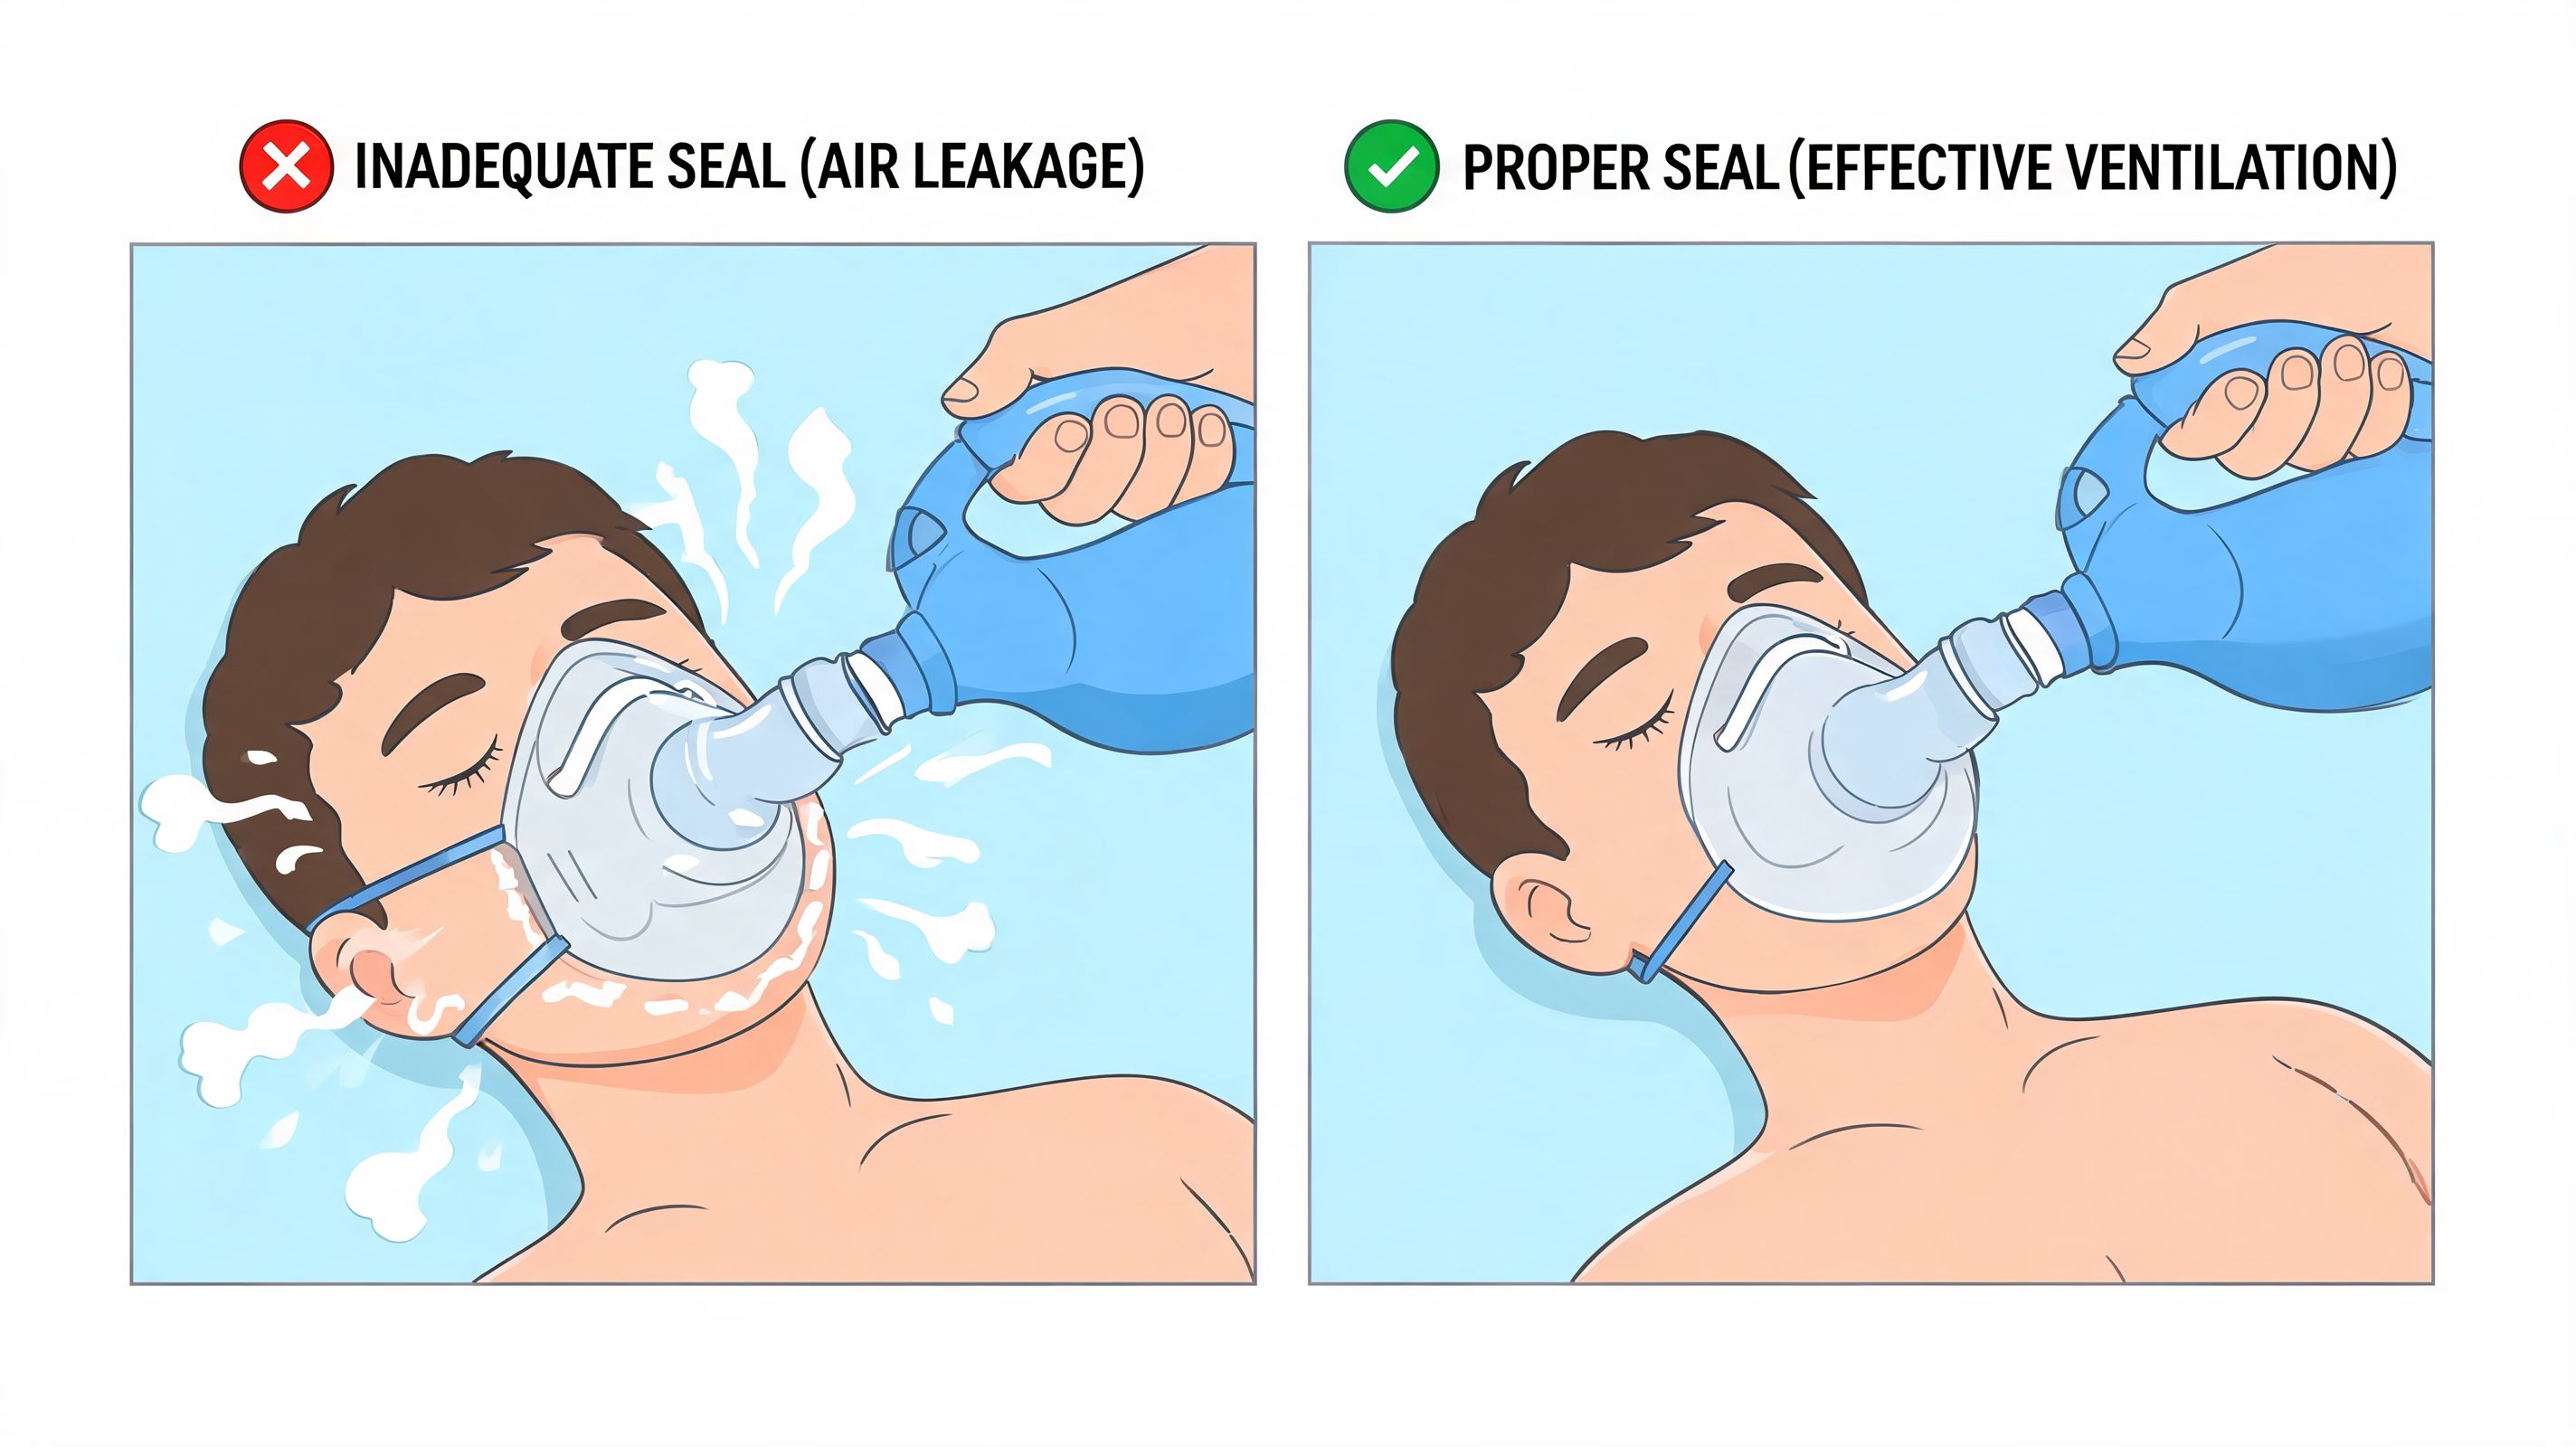
Mask size matters more than many people realize
A poor mask fit can ruin otherwise good technique. The mask should cover the mouth and nose without covering the eyes. If it rides too high, it can press toward the eyes and leak at the chin. If it’s too small, you’ll chase leaks around the edges and waste time.
A fast mental check helps:
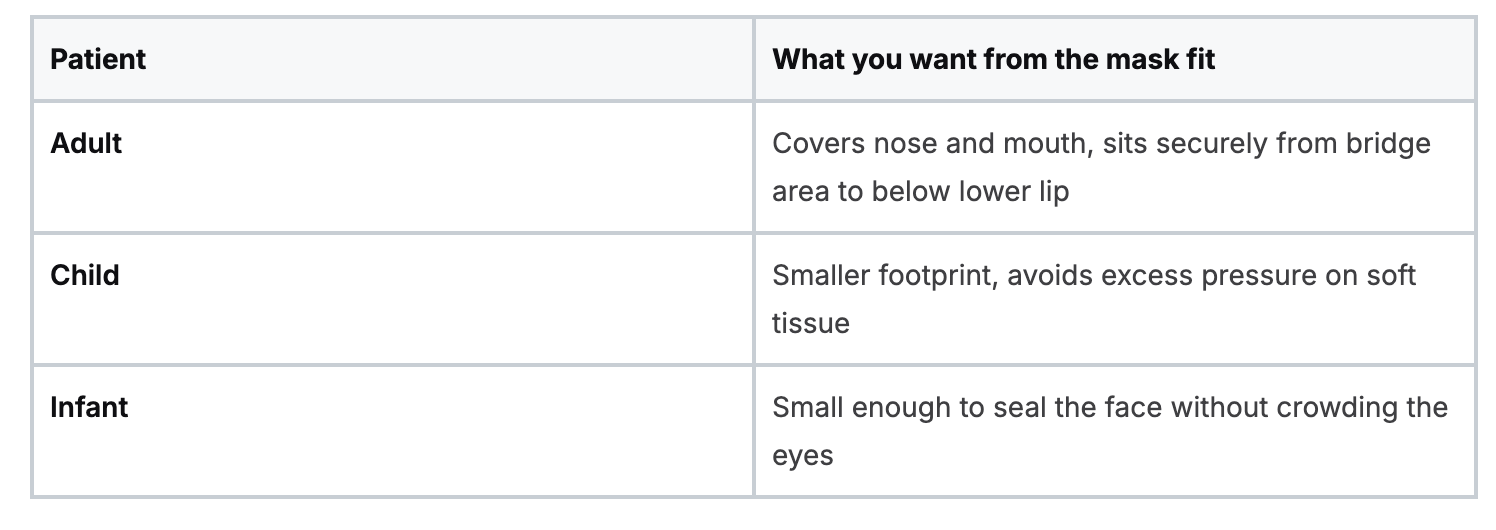
Don’t overcomplicate the choice. A correctly sized mask gives you your best chance at a seal before your hands ever move.
Your pre-use check
In training, learners often jump straight to hand placement. In practice, a fast equipment check saves frustration.
Use this sequence:
- Inspect the bag for obvious damage or poor recoil.
- Confirm the mask connection is secure.
- Attach oxygen if available and appropriate in your setting.
- Make sure the reservoir is connected if your setup uses one.
- Choose an airway adjunct if indicated and available, especially when the patient’s tone is poor.
If your setup feels awkward in your hands before you start, it won’t feel better once compressions are underway.
Prepare the patient, not just the device
The airway has to be open before the best BVM in the room can help. Position the head appropriately. Use a head-tilt-chin-lift unless trauma concerns require a jaw thrust. If the patient lacks a gag reflex, an oropharyngeal airway can make ventilation easier. If the patient has an intact gag reflex, a nasopharyngeal airway may be the better adjunct.
You don’t need a dramatic setup ritual. You need a reliable one. Equipment familiarity reduces hesitation, and hesitation is what steals time during resuscitation.
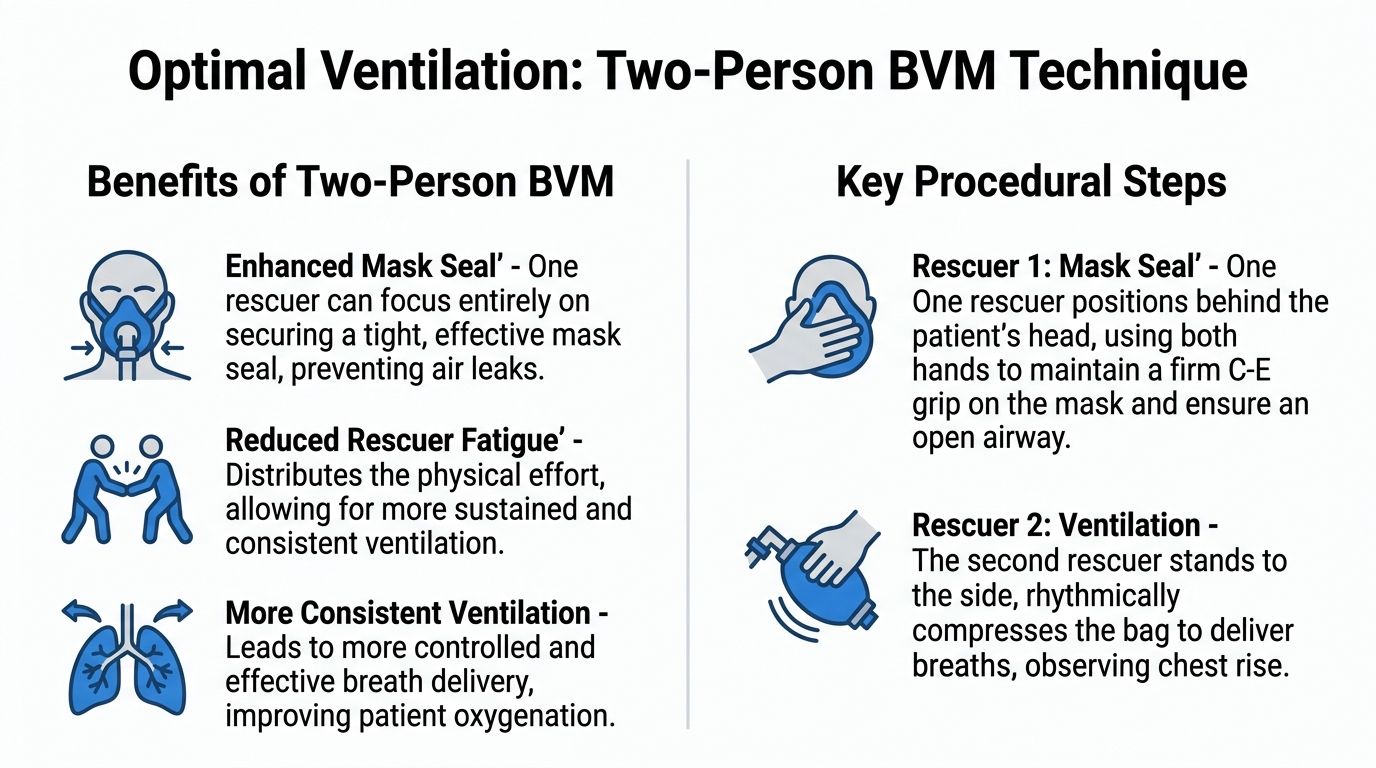
The Two-Person BVM Technique for Optimal Ventilation
A patient is supine, compressions are in progress, and the first breath with the bag barely moves the chest. That moment is where two-person BVM shows its value. With one rescuer focused on the airway and mask seal, and the other focused on breath delivery, ventilation becomes more controlled and more reliable.
That is why experienced resuscitation teams prefer this setup whenever staffing allows.
Research highlighted by UT Southwestern found that two-person BVM use improves mask seal and delivered ventilation because one provider can devote both hands to airway control while the second manages the bag.
Start with the visual overview.
The role split that makes this work
Two-person BVM works well because each rescuer protects one part of the task.
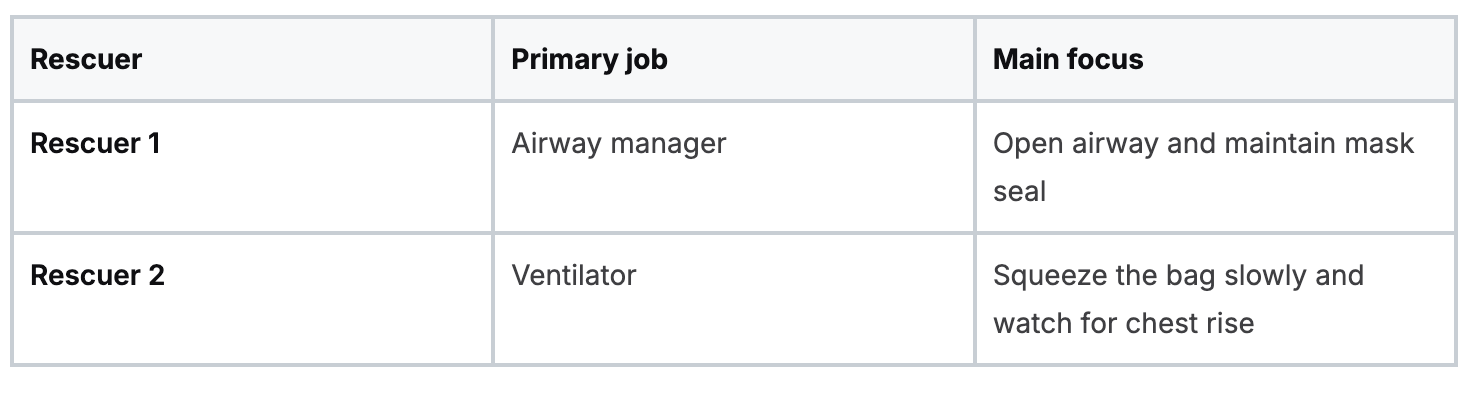
That division matters more than new learners often expect. Bag-mask ventilation is less like one big skill and more like three small skills happening at once: airway position, face seal, and breath timing. Splitting those jobs reduces errors at every step.
Rescuer 1 and the double E-C seal
The airway manager usually takes position at the head of the patient and places both hands on the mask.
The classic hand position is the double E-C clamp:
- Your thumbs and index fingers form the “C” around the mask.
- Your middle, ring, and little fingers form the “E” along the jaw and lift the mandible.
The hand shape is only a guide. The primary goal is to create two forces at the same time. The mask stays stable on the face, and the jaw comes up toward the mask. That combination works like closing a lid while lifting the container to meet it. If you only push down, soft tissue collapses, leaks increase, and the airway may narrow.
New clinicians often make that mistake. They press harder when chest rise is poor. A better correction is usually to improve the jaw lift, recheck head position, and keep the mask centered.
Rescuer 2 and breath delivery
The second rescuer handles the bag and watches the patient, not just the equipment.
Deliver each breath with a slow, controlled squeeze and stop once you see visible chest rise. Large or forceful breaths do not make ventilation better. They raise airway pressure, increase leak around the mask, and make gastric inflation more likely.
Body mechanics help here. If the person squeezing the bag is twisted, reaching, or kneeling too far from the patient, the breaths often become fast and uneven. These BLS positioning best practices are useful if your team needs a better setup during floor-based resuscitation.
The short demonstration below is helpful once you’ve got the role split in mind.
A step-by-step sequence you can trust
Use this order in practice:
- Confirm roles out loud
- One rescuer owns the airway and mask.
- One rescuer owns the bag and watches for chest rise.
- Optimize the airway
- Position the head appropriately.
- Use jaw thrust if trauma is a concern.
- Add an airway adjunct if indicated and available.
- Set the mask before any breath
- Center it over the nose and mouth.
- Check that the cushion sits evenly on the face.
- Build the seal with two hands
- Rescuer 1 lifts the jaw into the mask.
- Avoid pressing the mask deep into the face.
- Deliver a measured breath
- Rescuer 2 squeezes slowly.
- Stop with visible chest rise.
- Recheck after every ventilation
- Is the chest rising?
- Is air leaking near the cheeks or eyes?
- Did the jaw lift slip?
- Has compression activity shifted the head or mask?
This repeated reassessment is what separates a basic attempt from effective ventilation. In difficult airways, small adjustments often matter more than stronger squeezes. A slight change in head position, a firmer mandibular lift, or better timing between teammates can turn a poor seal into a useful breath.
Common mistakes during two-person ventilation
Even with two trained rescuers, a few problems appear again and again:
- Too much bag squeeze. This raises pressure without improving ventilation.
- Mask pressure without jaw lift. The mask looks seated, but the airway is still poorly opened.
- Eyes on the bag instead of the chest. Breath delivery should be guided by patient response.
- Unclear communication. If nobody says “good seal,” “no chest rise,” or “reposition,” delays build quickly.
- Loss of technique during a difficult airway. Beard, facial trauma, obesity, dentures, or poor positioning can break the seal fast.
Teams get better at this skill through repetition, feedback, and realistic practice, not memorization alone. That is one reason modern online certification platforms matter. They give clinicians a flexible way to learn the sequence, review difficult-airway decision points, and arrive at hands-on practice with a much clearer mental model.
Good two-person BVM should look controlled and almost quiet. Steady hands, brief communication, visible chest rise, then reassessment. That is the standard you want in a real code.
Managing a One-Person BVM Scenario
You arrive first. Compressions are underway, the patient needs ventilation, and no second set of hands is beside you yet. In that moment, one-person BVM is less about perfect form and more about controlling a difficult task with discipline.
Single-rescuer BVM is hard for a simple reason. One hand has to hold the mask, support the airway, and limit leak. The other has to squeeze the bag with enough force to create visible chest rise, but not so much that you overventilate. It is a bit like trying to hold a door open, keep the frame aligned, and push air through the room at the same time. Small errors in position create big losses in performance.
.png)
What good one-person BVM looks like
Start by setting your priorities in the right order. New rescuers often focus on the bag because it feels active. The airway and seal come first.
- Open the airway before you deliver the breath
- Place the mask correctly on the bridge of the nose and over the mouth
- Lift the jaw into the mask instead of pushing the mask down into the face
- Squeeze the bag slowly enough to watch the chest respond
That last point matters. If chest rise is poor, squeezing harder usually sends more air into the stomach or out through a leak. It does not fix the underlying problem. A controlled breath is safer and more informative. If you need a refresher on why forceful, rapid breaths cause problems during resuscitation, review the effects of excessive ventilation during CPR.
Choosing one-person BVM with clear eyes
One-person BVM can work, but it has limits. Earlier research discussed in this article found that single-rescuer ventilation often suffers from reduced seal quality and lower consistency, especially compared with techniques that free both hands for airway control. That matters most in practical scenarios that already challenge you, such as obesity, facial hair, poor positioning, secretions, or altered facial anatomy.
A practical rule helps here. If you can maintain an open airway, get visible chest rise, and avoid long interruptions, one-person BVM is reasonable while help is still arriving. If those pieces start to fall apart, the technique is no longer serving the patient well.
Use one-person BVM when:
- You have the device ready and can create an effective seal
- Your training and hand position are producing visible chest rise
- A second rescuer is not immediately available
Change course when:
- Repeated breaths show poor or absent chest rise
- You are losing too much time or control between tasks
- Another airway option would let you ventilate more reliably in the moment
That decision is not a retreat. It is clinical judgment.
Hand position and practical adjustments
The standard one-handed E-C clamp remains the starting point for most clinicians. Your thumb and index finger form the seal on the mask. The remaining fingers lift the mandible. The key word is lift. New providers often press the mask firmly into the face and assume that stronger pressure means a better seal. In practice, jaw support usually matters more.
Some clinicians get a better result by shifting slightly toward a thenar-eminence style hold, especially when the face shape makes a standard grip unstable. The goal is the same either way. Keep the airway open, limit leak, and deliver a breath that produces visible chest movement.
If the mask keeps sliding, stop and reset. If the chin is dropping, reestablish mandibular lift. If the head position is poor, correct that before the next breath. These are small corrections, but they are often the difference between ineffective ventilation and useful ventilation.
What to do while you are still alone
Work through the same mental sequence each time.
Airway. Seal. Breath. Chest rise. Reassess.
That sequence reduces panic because it gives you a repeatable checklist under pressure. It also helps you identify whether the failure is coming from position, seal, or delivery. Clinicians who perform well in one-person BVM usually are not stronger. They are more deliberate.
This is one of the skills that benefits from modern online certification more than many people expect. The hands-on part still matters, but strong performance starts with pattern recognition. Reviewing difficult-airway examples, common one-person errors, and correction steps through online course modules helps clinicians arrive at practice sessions with a clearer plan and a better eye for what is going wrong. That makes later skills validation more meaningful, not less.
When to ask for help
Ask for a second rescuer as soon as one is available. One-person BVM is a bridge technique, not the preferred long-term setup in a demanding resuscitation.
Experienced clinicians do this early and without hesitation. They know the goal is not to prove they can manage alone. The goal is to get the patient the most reliable ventilation possible.
Troubleshooting Common BVM Challenges
Most BVM failures are fixable if you identify the right problem quickly. New clinicians often label everything as “bad ventilation,” but the cause usually falls into a smaller set of issues.
Poor seal. Blocked airway. Bad position. Excessive force. Wrong mask.
Studies indicate that single-rescuer BVM ventilation achieves adequate tidal volumes in only 30-50% of cases, primarily due to poor mask seals. This failure rate underscores the importance of mastering two-person techniques and troubleshooting skills for difficult airways, which are present in up to 40% of prehospital cardiac arrests (NCBI Bookshelf discussion of BVM challenges and difficult airways).
Problem 1, no chest rise
If the chest isn’t rising, think in this order:
- Airway position. Reopen with head tilt-chin lift or jaw thrust.
- Mask seal. Re-seat the mask and lift the jaw into it.
- Obstruction. Look for obvious blockage, secretions, or poor tongue position.
- Technique. Deliver the breath slowly enough to see whether air is entering.
A missing chest rise is feedback. Use it.
Problem 2, air leaking around the mask
You may hear a hiss, feel airflow on your glove, or see the cheeks puff oddly without effective rise.
Try these corrections:
- Reposition the mask so it sits centered over mouth and nose
- Use two-person technique as soon as possible
- Add an airway adjunct if appropriate
- Lift the mandible more firmly instead of pressing harder on the mask
Bearded patients, edentulous patients, and patients with unusual facial contours are especially hard to seal. In those cases, your hand technique matters more than your grip strength.
Problem 3, difficult airway features
Some faces are harder to ventilate. Common trouble cases include:
- Bearded patients
- Obesity with soft tissue crowding
- Facial trauma
- Toothless patients with sunken cheeks
For these patients:
- Recheck mask size
- Use two-person technique early
- Prioritize jaw lift
- Consider whether an adjunct would improve patency
If your breaths are becoming rapid and forceful because you’re frustrated, pause and reset. That usually worsens the situation.
Problem 4, gastric insufflation
If air is going into the stomach, you may notice abdominal distention or poor ventilation despite bag squeeze. This often happens when breaths are too fast or too forceful.
The correction is mechanical:
- Slow the squeeze
- Use only enough volume for chest rise
- Reopen the airway
- Watch your timing carefully
If you want a focused review of why over-bagging is dangerous during resuscitation, this article on the effect of excessive ventilation is worth keeping in your study stack.
A leaking seal and an overfilled stomach often come from the same habit. Trying to compensate for poor technique by squeezing harder.
Special Considerations for Pediatric and Neonatal Patients
Pediatric and neonatal BVM ventilation requires a different mindset. The anatomy is different, the margin for error is smaller, and over-ventilation becomes a bigger threat.
Children are not miniature adults. Your hands, equipment choice, and ventilation style all need to adjust.
Equipment and positioning change first
The right mask size matters even more in smaller patients. A mask that’s too large can crowd the eyes, distort the seal, and make your hand position clumsy. A bag that’s too large makes it easier to deliver too much volume without realizing it.
Positioning also changes. Infants and small children may need more careful head alignment to achieve a neutral or sniffing position. If you overextend the neck, you can worsen the airway.
Rate confusion is real in pediatrics
There are stark gaps in pediatric guidance, with some sources recommending 1 breath every 2-3 seconds while others suggest 12-20 breaths per minute. Data also indicates over-ventilation is a primary factor in up to 30% of pediatric CPR failures (Red Cross guideline database discussion of CPR ventilation rate questions).
That inconsistency confuses learners, especially when they bounce between courses, videos, and workplace habits.
The practical answer is to stay disciplined:
- Use age-appropriate equipment
- Deliver small breaths, not adult-sized breaths
- Watch the chest, not your assumptions
- Avoid rapid, repetitive squeezing
What good pediatric ventilation looks like
In adults, beginners often under-seal and over-squeeze. In pediatrics, they often overdo both speed and volume.
Look for:
- a gentle visible chest rise
- controlled hand pressure
- stable airway position
- reassessment after each breath
Don’t try to “fill the lungs.” You’re supporting oxygenation and ventilation with the least force needed.
Why precise training matters
Pediatric BVM skill improves when training emphasizes judgment, not just memorization. Learners need repetition with age-specific scenarios and the chance to revisit confusing points. That’s one reason online education fits this topic so well. It gives clinicians room to slow down, replay concepts, compare guidelines, and reinforce pediatric differences without the pressure of a rushed live class.
If your course format helps you return to the material until it clicks, that’s not a compromise. That’s good education.
Your Path to BVM Mastery and Certification
You are at the bedside, the monitor is alarming, and someone hands you the bag. In that moment, BVM skill is not a checklist item. It is your ability to create oxygen movement with calm hands, clear decisions, and quick corrections when the first attempt is not good enough.
That is why mastery matters. Good ventilation depends on judgment under pressure. You need to recognize whether the problem is the seal, the airway position, the mask size, the squeeze volume, or the patient’s anatomy. New clinicians often assume BVM is a basic skill that sits below advanced airway care. In practice, it is often the skill that keeps a patient oxygenated while the rest of the team catches up.
Research comparing prehospital airway strategies has also reinforced a practical lesson. Basic airway support with a bag-valve-mask can produce strong outcomes in cardiac arrest care when it is performed well. For a learner, the takeaway is simple. Do not treat BVM as the fallback option. Treat it as a frontline resuscitation skill.
Real proficiency goes beyond remembering hand placement. It includes spotting a difficult airway early, adjusting before repeated ineffective breaths waste time, and knowing when a second set of hands changes the whole attempt. A well-run BVM effort works like a team lift in the ICU. One person creates alignment and stability. The other delivers controlled force. Remove either part, and the job gets harder fast.
Certification should reflect how this skill is actually learned
BVM improves through repetition, review, and scenario-based thinking. Clinicians need to see what good ventilation looks like, compare it with common errors, and revisit the details that are easy to miss during a live class. That is one reason online certification has become a practical option for working professionals.
A strong online course gives you room to pause, replay, and test your understanding of airway positioning, ventilation timing, difficult-mask scenarios, and age-specific adjustments. That format supports the kind of learning BVM requires. You are not just memorizing steps. You are building pattern recognition.
ProMed Certifications is one example of an online provider clinicians use for BLS, ACLS, PALS, CPR, and related coursework based on current AHA-guideline standards. The bigger point is that modern certification platforms can teach and validate this skill in a way that fits real schedules without lowering the standard.
Your credential should support competent practice. Your training format should help you return to tough material until it becomes usable at the bedside.
If you’re ready to strengthen your airway and resuscitation skills, ProMed Certifications offers a flexible way to complete CPR, BLS, ACLS, PALS, and related training online, with guideline-based content you can review on your own schedule.
.avif)
Stay compliant with ProMed+
Certifications included: ACLS, BLS, PALS, CPR & Neonatal Resuscitation
Unlimited continuing education: over 200 hours of accredited CME
All-inclusive: One price. No surprises.
Get certified today
The Advanced Cardiac Life Support (ACLS) is an accredited online medical certification course that teaches medical professionals to respond to nearly all cardiopulmonary emergencies.
The Pediatric Advanced Life Support (PALS) Recertification instructs medical professionals on performing pediatric cardiopulmonary resuscitation in emergencies.
The Basic Life Support (BLS) Recertification is intended to teach healthcare professionals the basic steps of CPR and rescue breathing for adults, children, and infants.
Our online medical certification course for CPR, Automated External Defibrillator (AED), and First Aid is designed to teach adult, child, and infant CPR and AED use.
The Neonatal Resuscitation Certification trains medical professionals in performing resuscitation procedures and life-saving techniques for newborns at the time of delivery.

.png)
.png)
.png)